Restorative Dentistry Gallery
Dr Jack M Hosner DDS
Take a Look at Our Restorative Dentistry Gallery
At Dr. Jack M Hosner DDS, we understand that life can sometimes take a toll on your teeth, whether through chips, wear, or missing teeth. Our gallery highlights the remarkable restorations that bring back not only the function of your smile but also your confidence. From crowns and bridges to dental implants and dentures, each image represents our commitment to personalized care and lasting solutions. Contact us to achieve your dream smile.
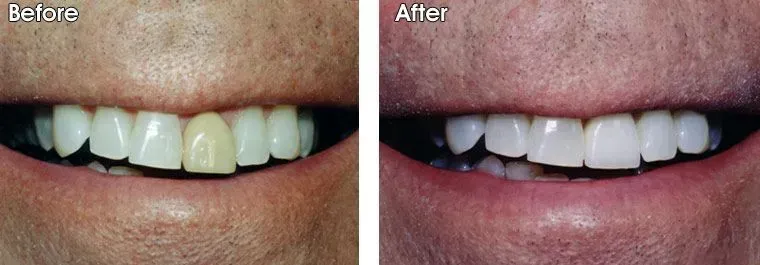
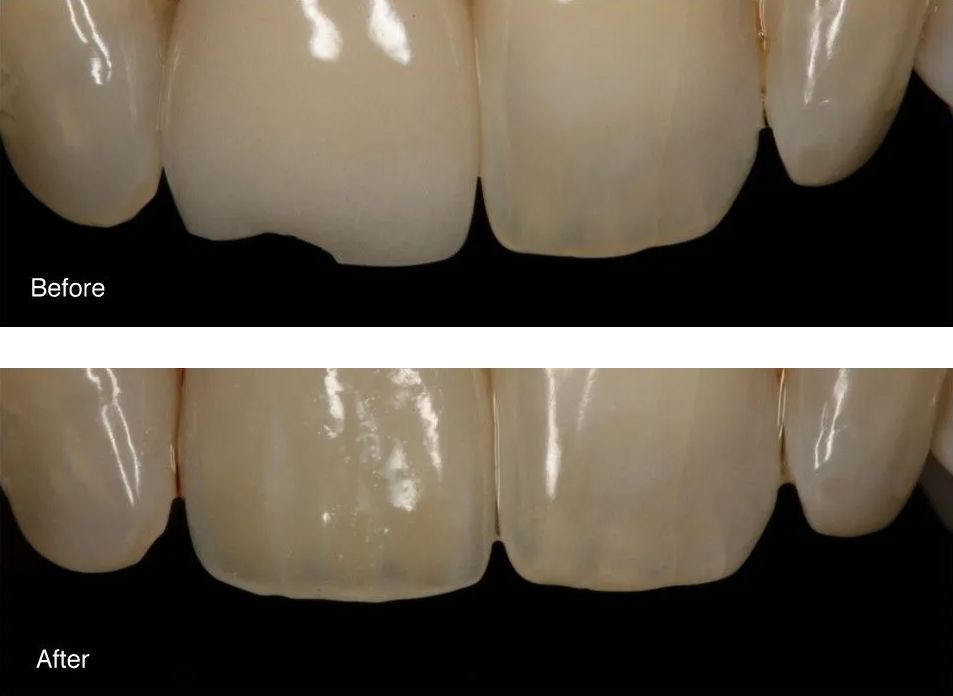
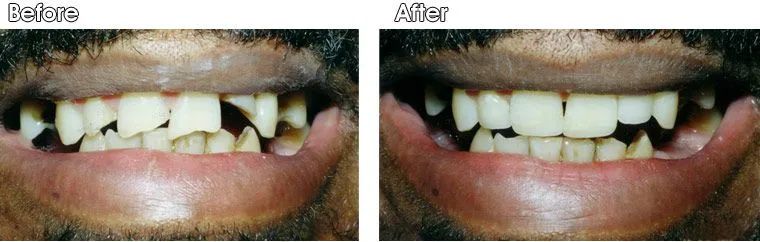
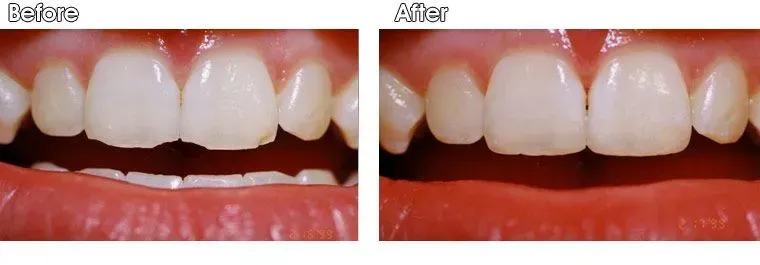
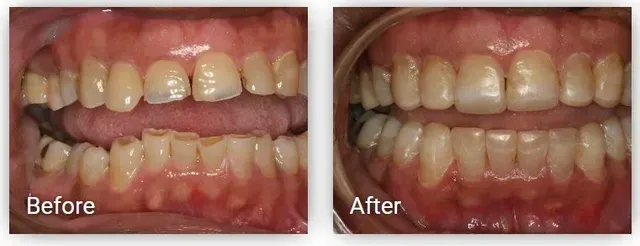
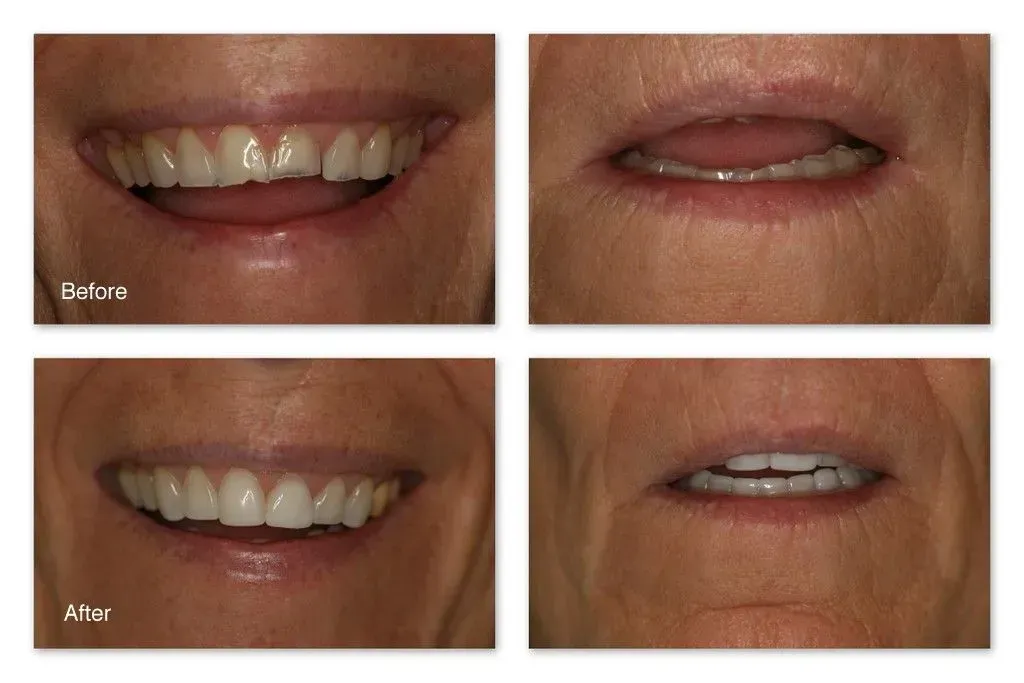
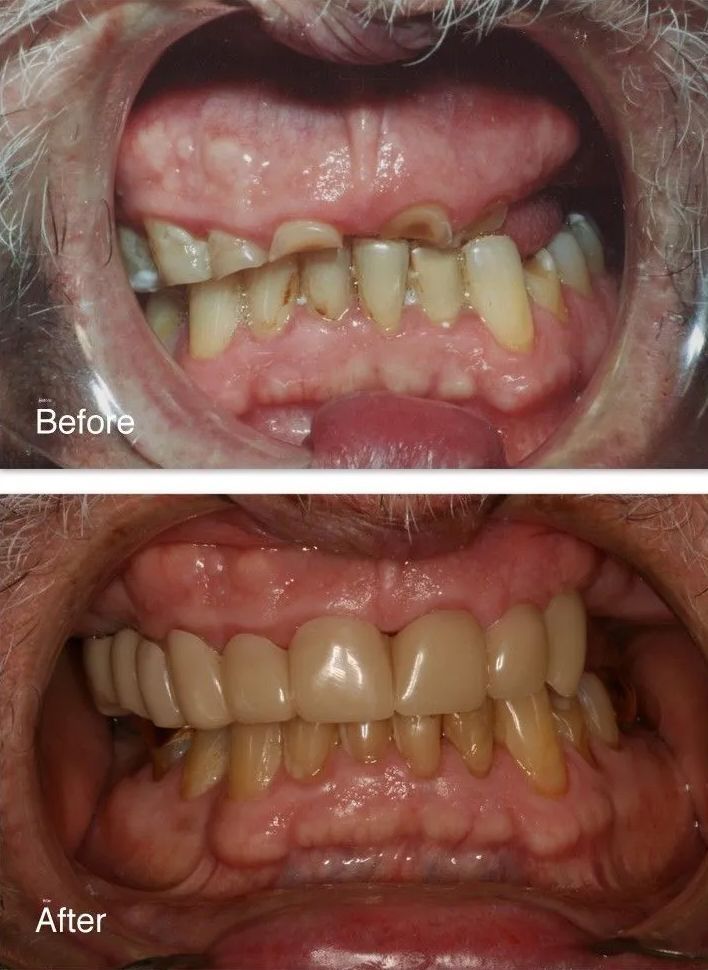
Crowns
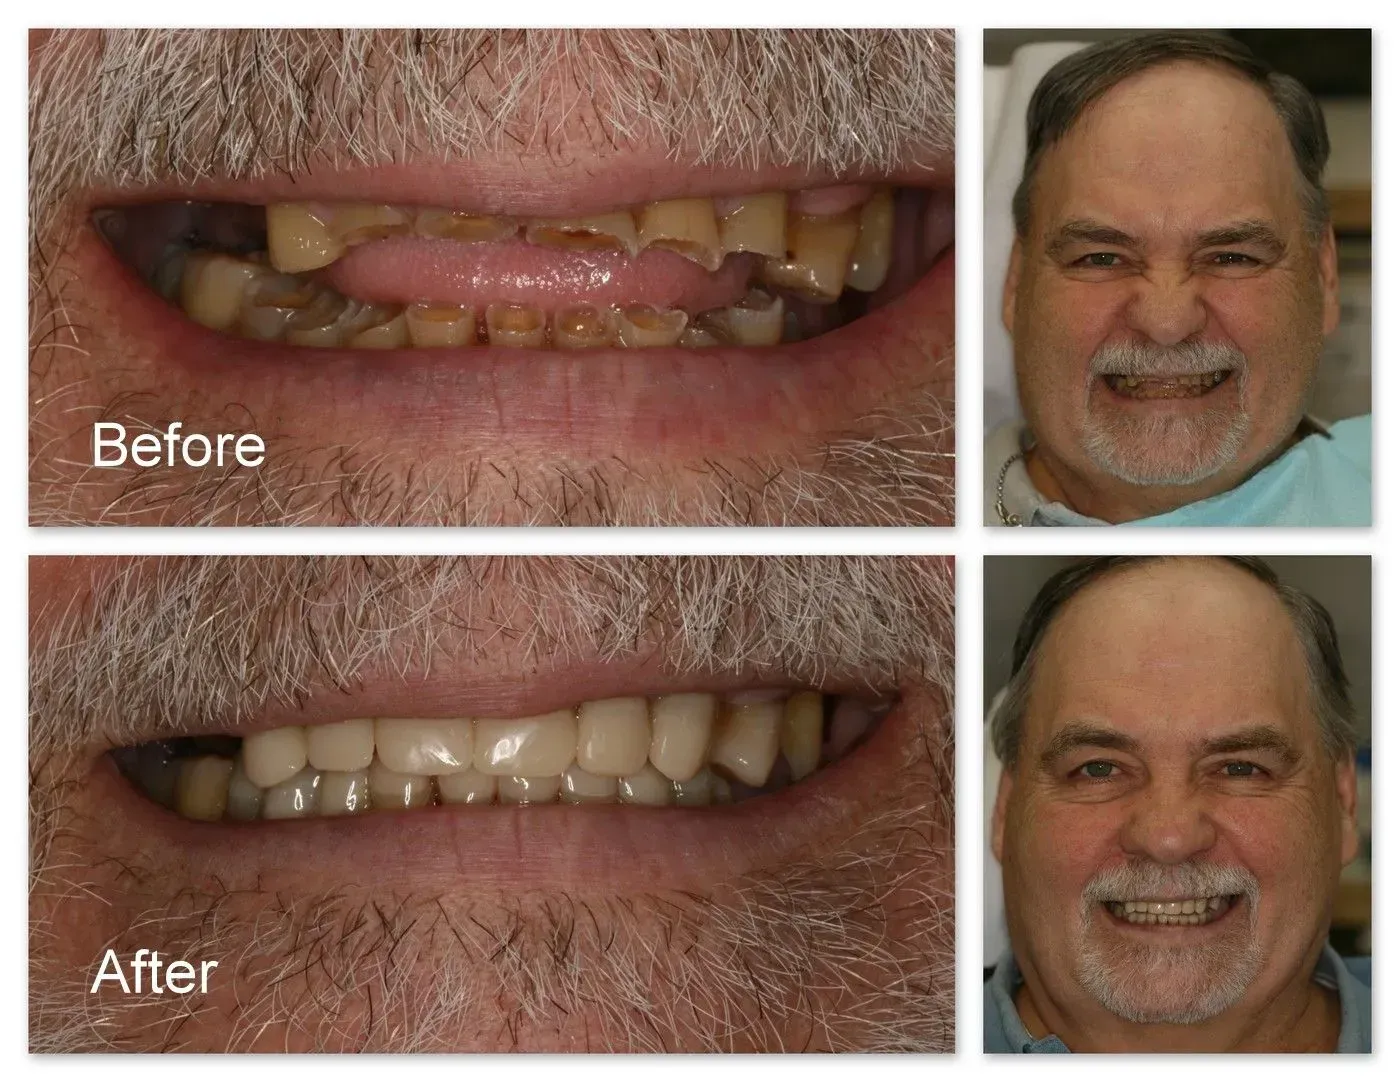
Case 1:
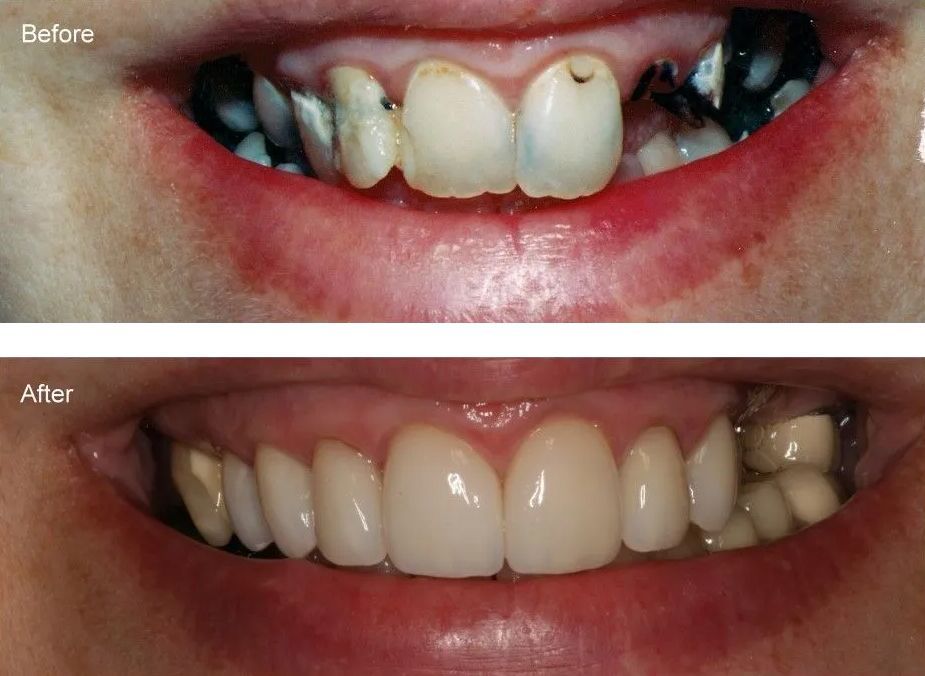
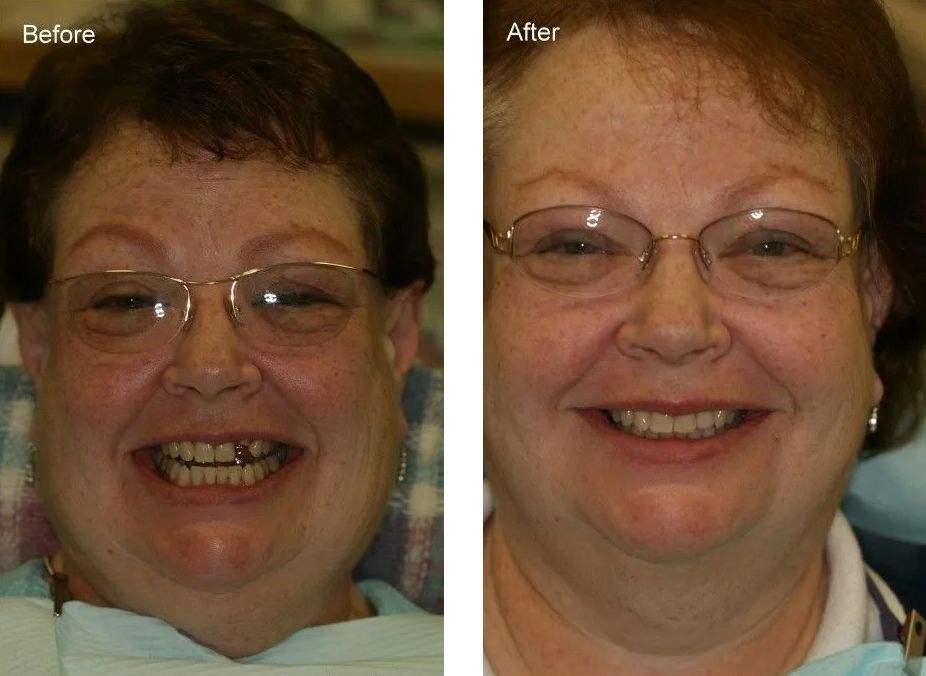
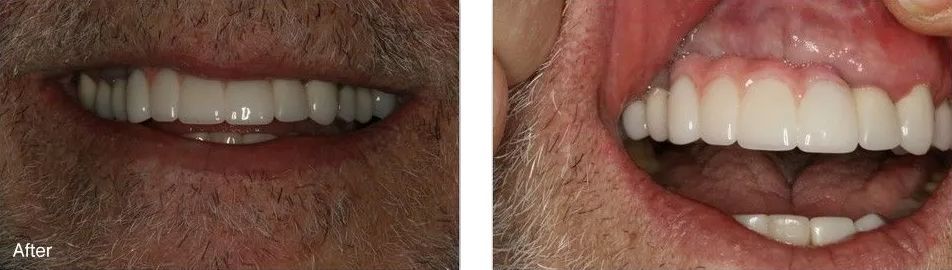
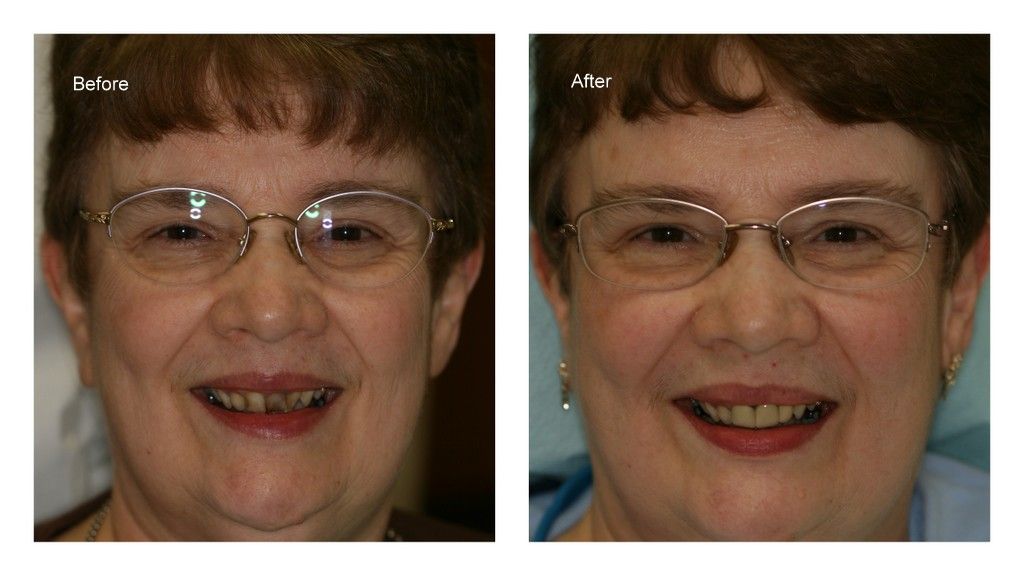
Before - This patient came to Dr. Jack Hosner’s office in Portage, MI unhappy with her smile. She had severely decayed and broken teeth.
After - This photo shows all the decay removed and seven upper teeth restored with porcelain crowns. No teeth were removed, and further treatment is needed.
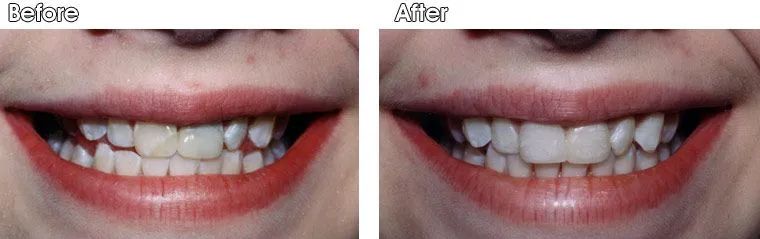
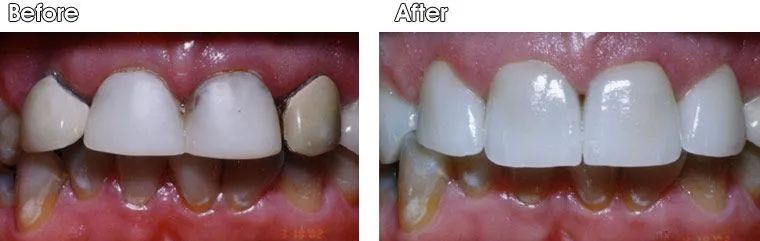
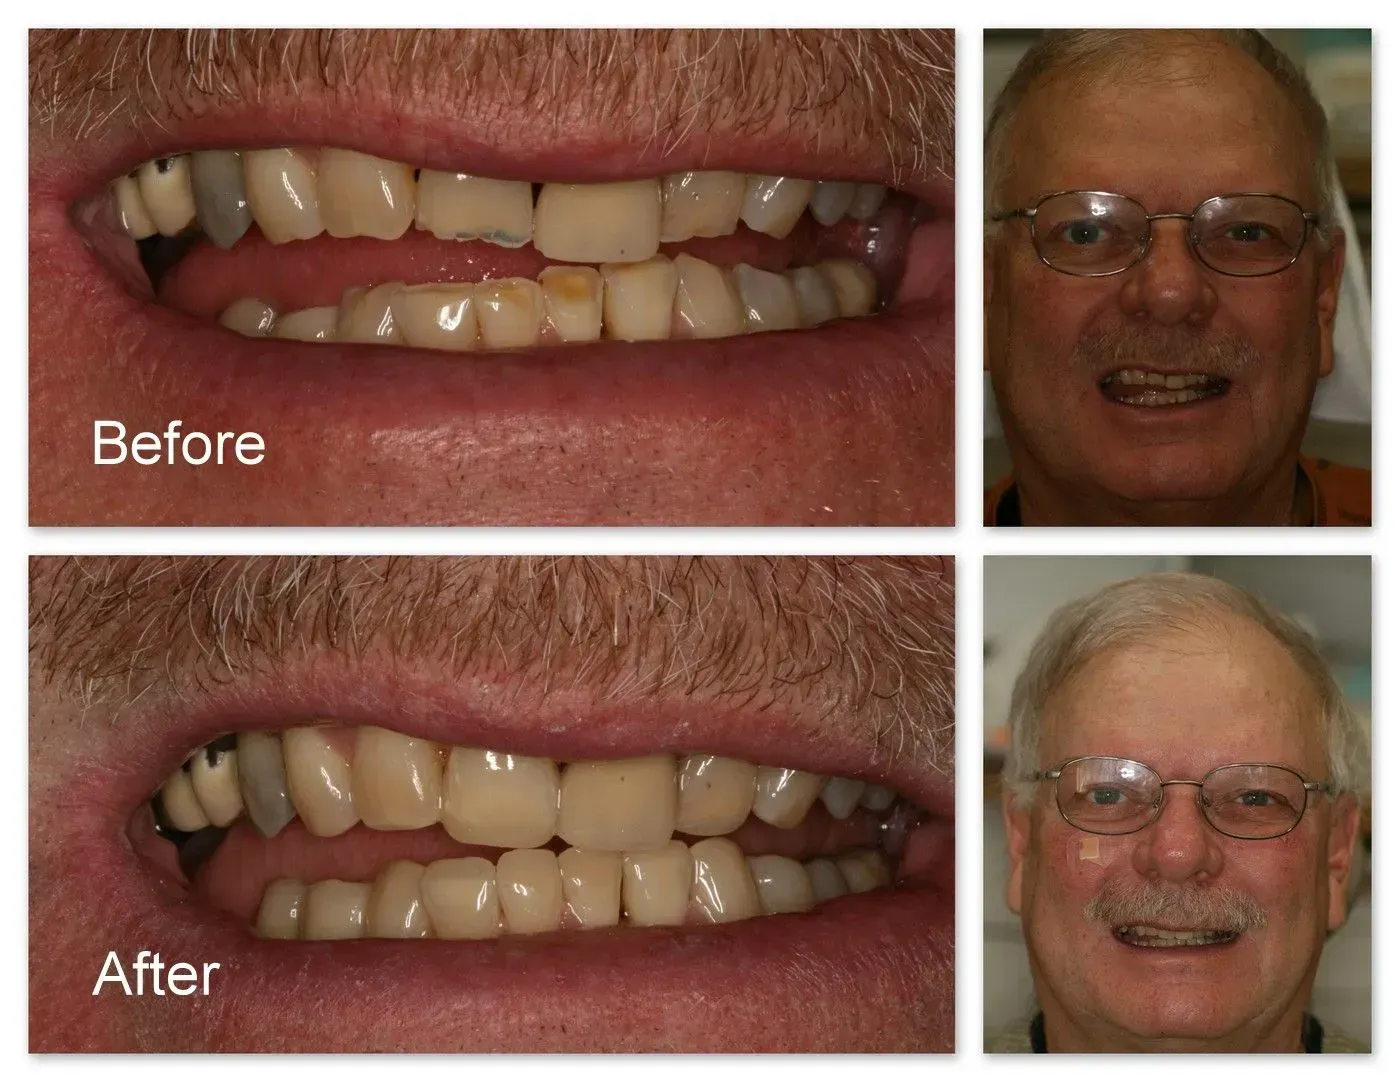
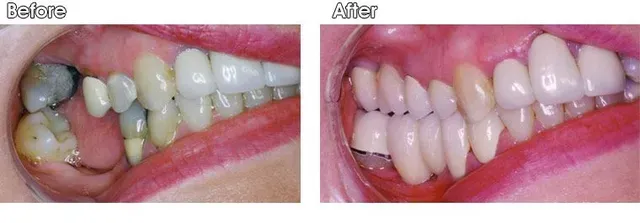
Case 2:

Before - This patient of Dr. Jack Hosner’s from Portage, MI did not like the crooked and stained appearance of her teeth and she did not want orthodontics (braces).
After - Porcelain crowns and veneers were placed to whiten and straighten this patient’s smile.
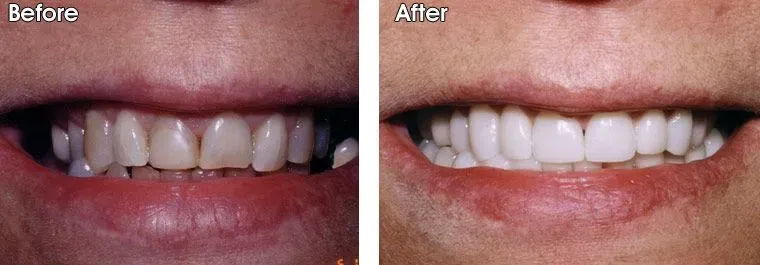
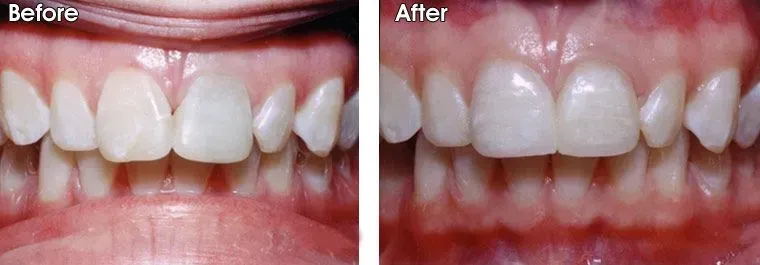
Close-Up of Above Patient
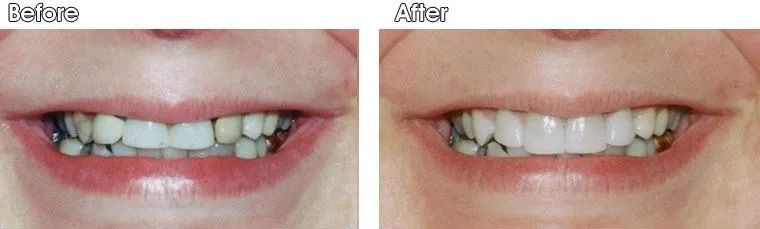
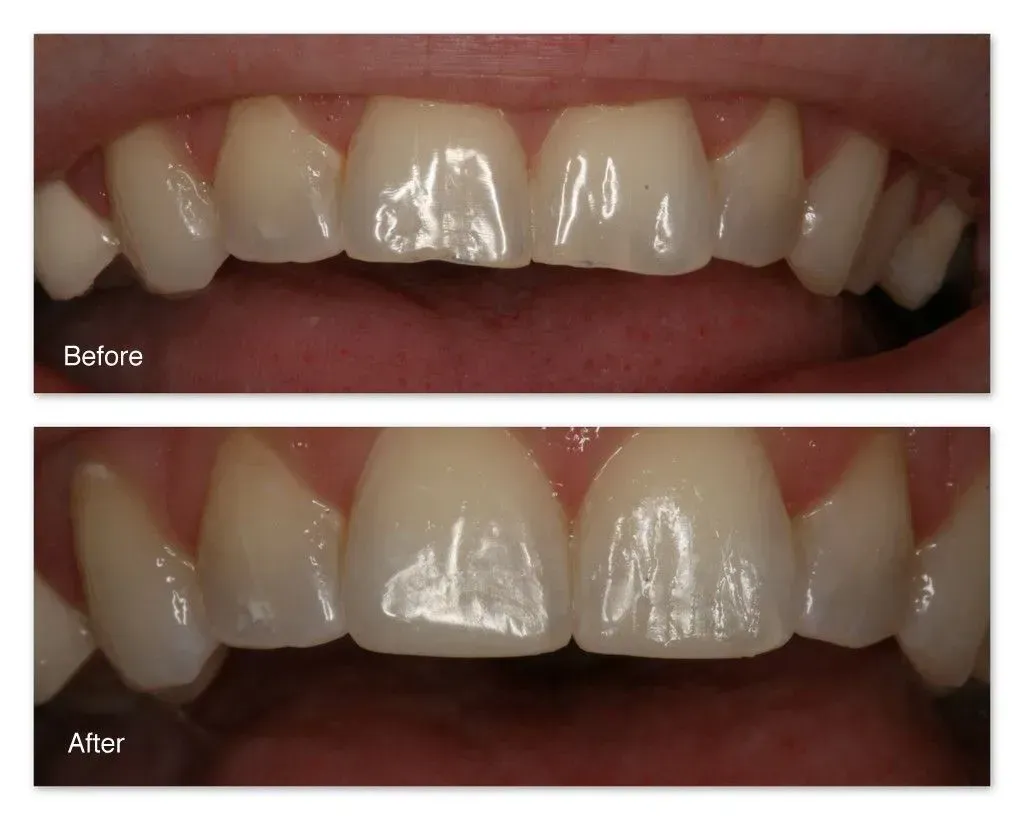
Case 3:
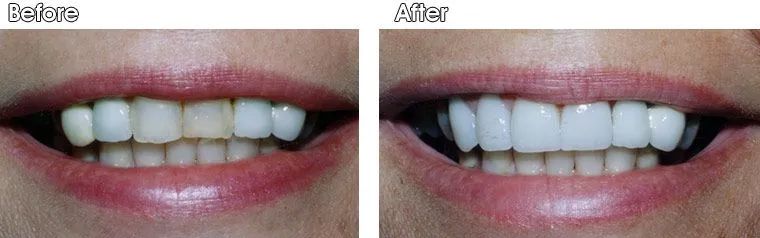
Before - This patient didn’t like the staining or shape of the two front teeth, nor the shape and color of the two teeth to the left.
After - Dr. Jack Hosner of Portage, MI placed four porcelain crowns on these teeth to improve color and shape.
Case 4:
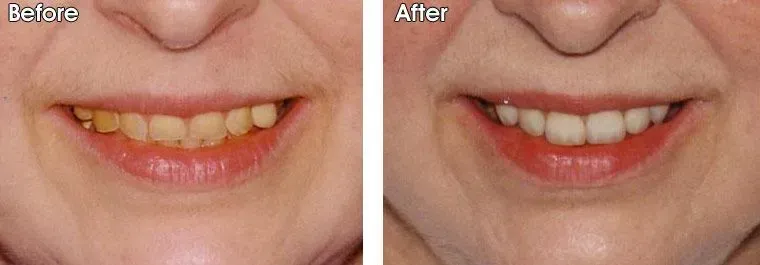
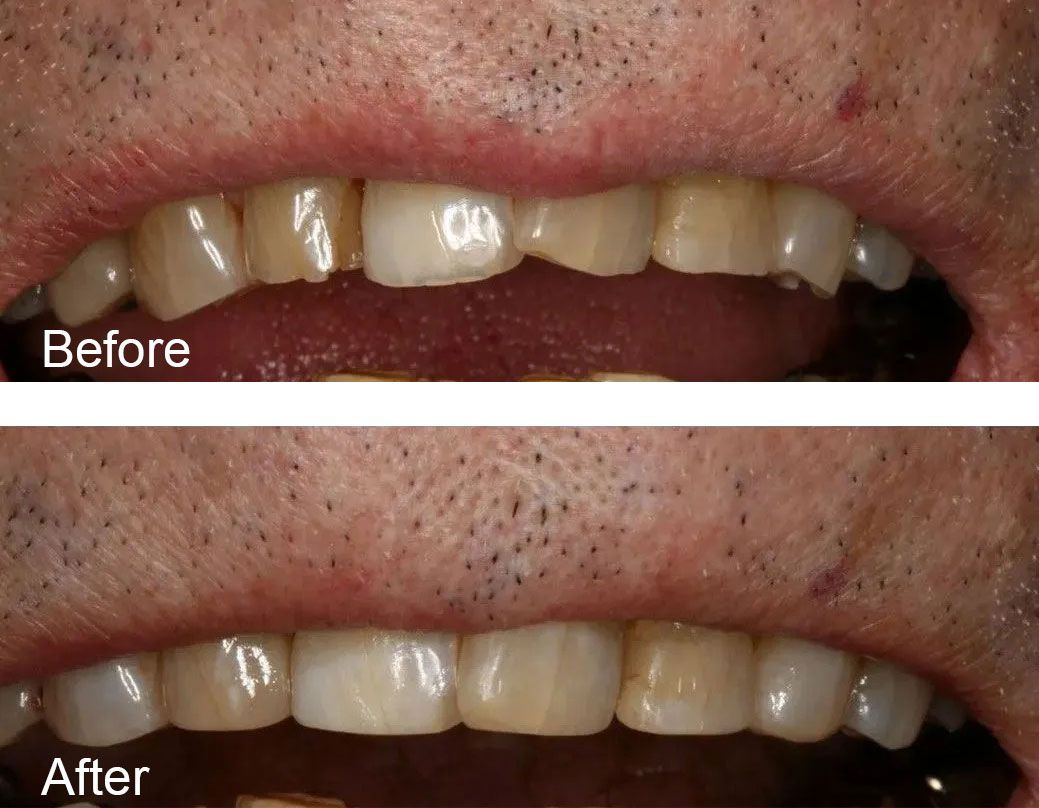
Before - Very short and worn/eroded, dark, yellow teeth.
After - Porcelain crowns were placed by Dr. Jack M. Hosner, DDS of Portage, MI to protect teeth from further erosion and to provide a better smile.
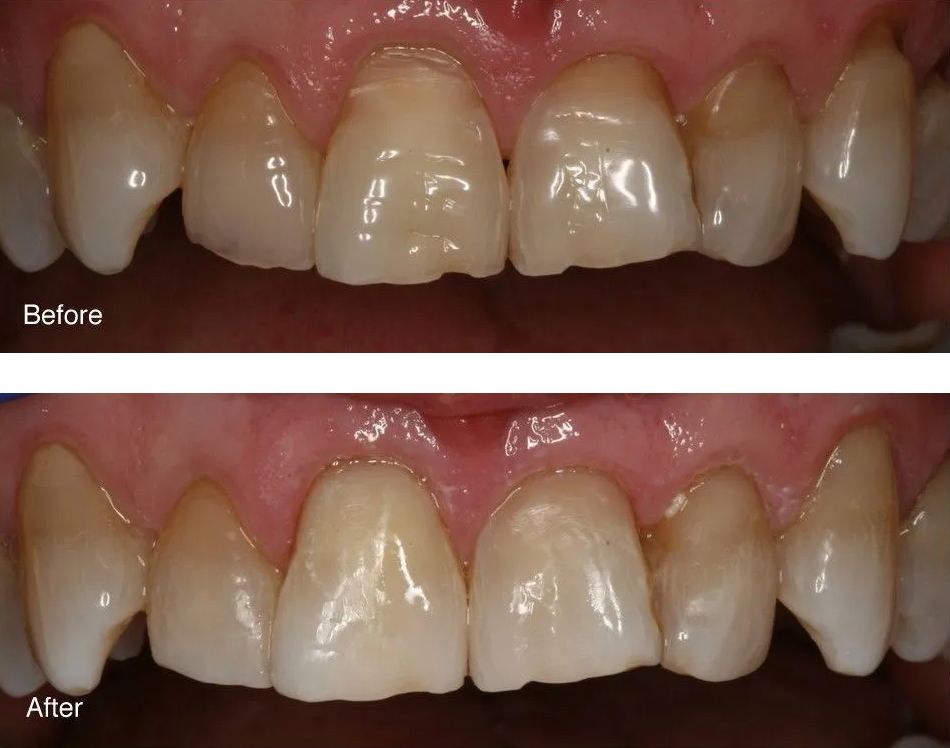
Case 5:
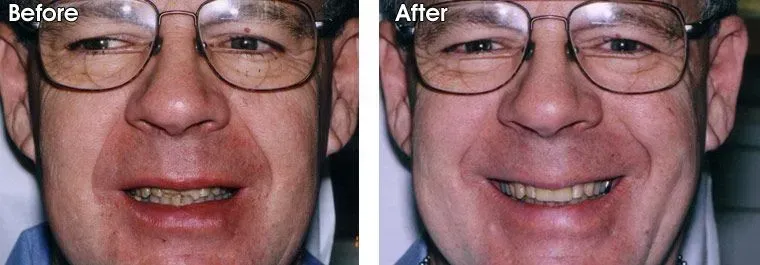
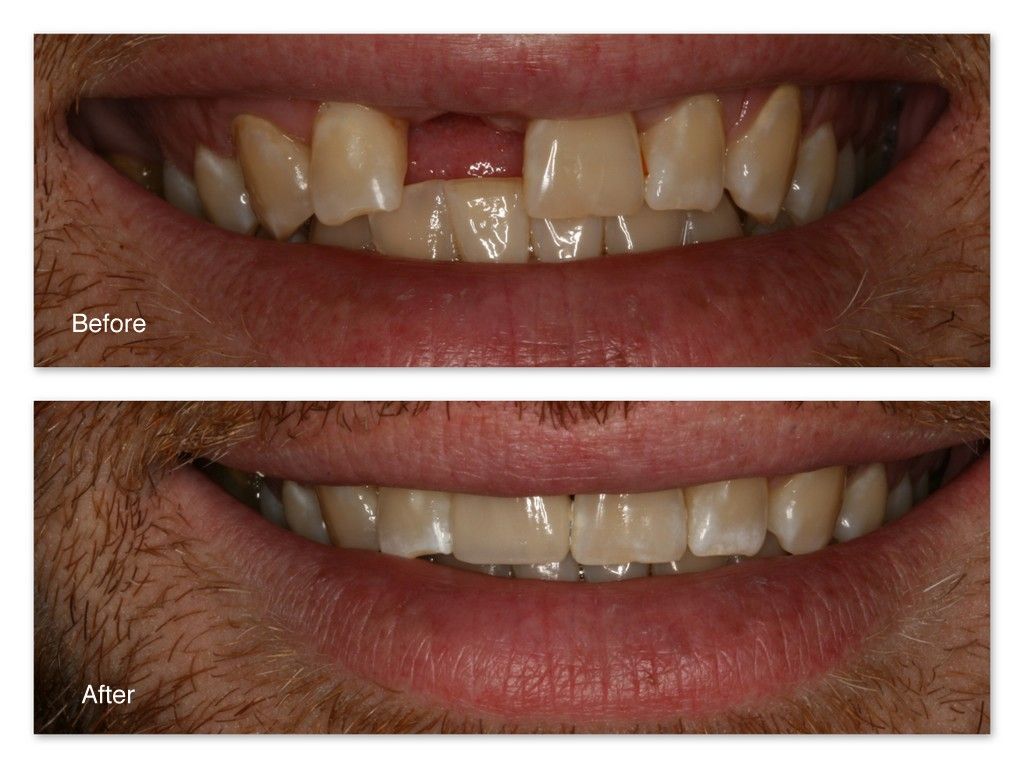
Before - This patient of Dr. Jack Hosner’s from Portage, MI did not like the discolored and poorly shaped front porcelain crown.
After - The new porcelain crown really improves appearance of smile.
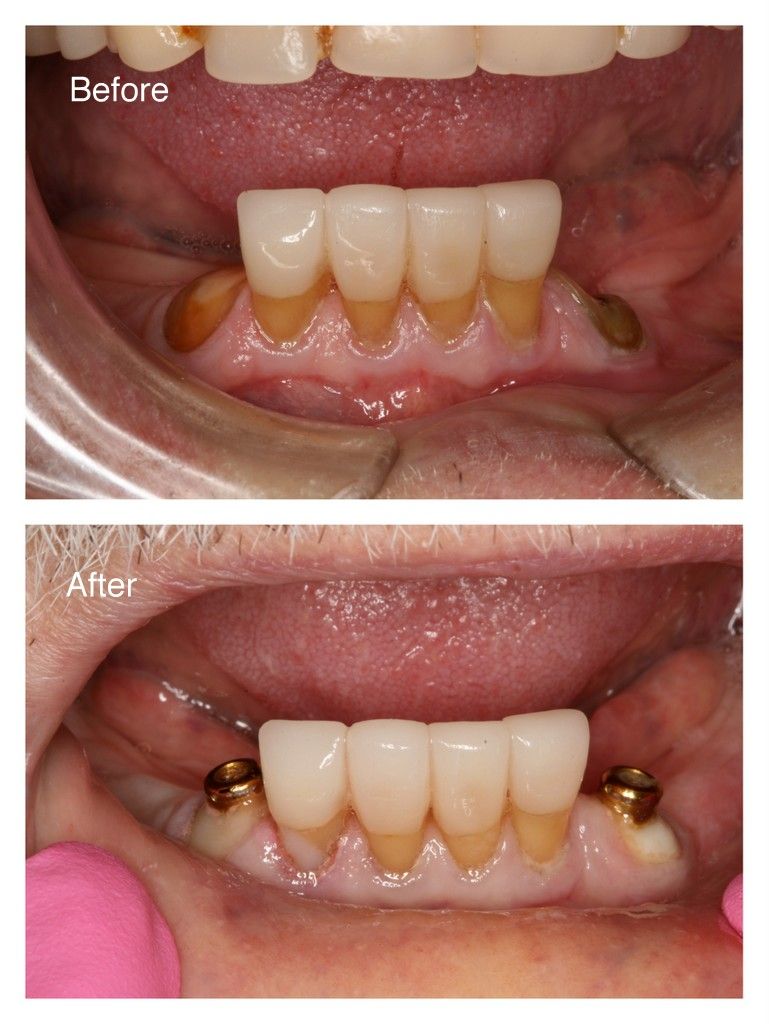
Case 6:
Before - Crooked front teeth with large composite tooth colored fillings. One of these teeth also had root canal treatment which further weakened the tooth.
After - Dr. Jack Hosner of Portage, MI placed two porcelain crowns on these 2 front teeth to protect them from fracture, and also to straighten and improve esthetics.
Close-Up of Above Patient
Case 7:
Before - Old, unattractive PFM crowns on this patient’s upper front 4 teeth.
After - Dr. Jack Hosner of Portage, MI placed four new porcelain crowns.
Close-Up of Above Patient
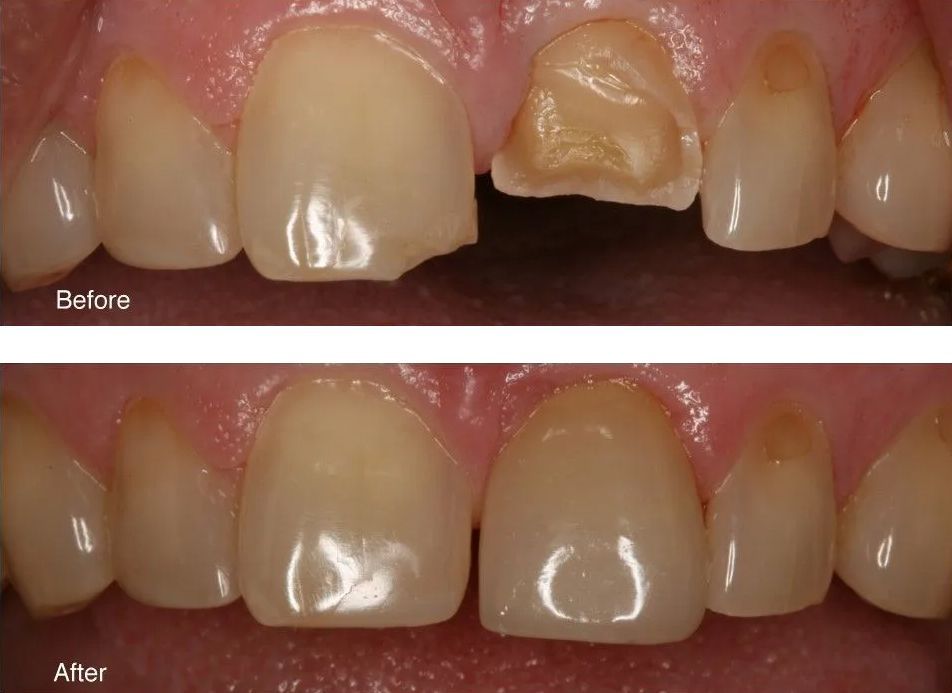
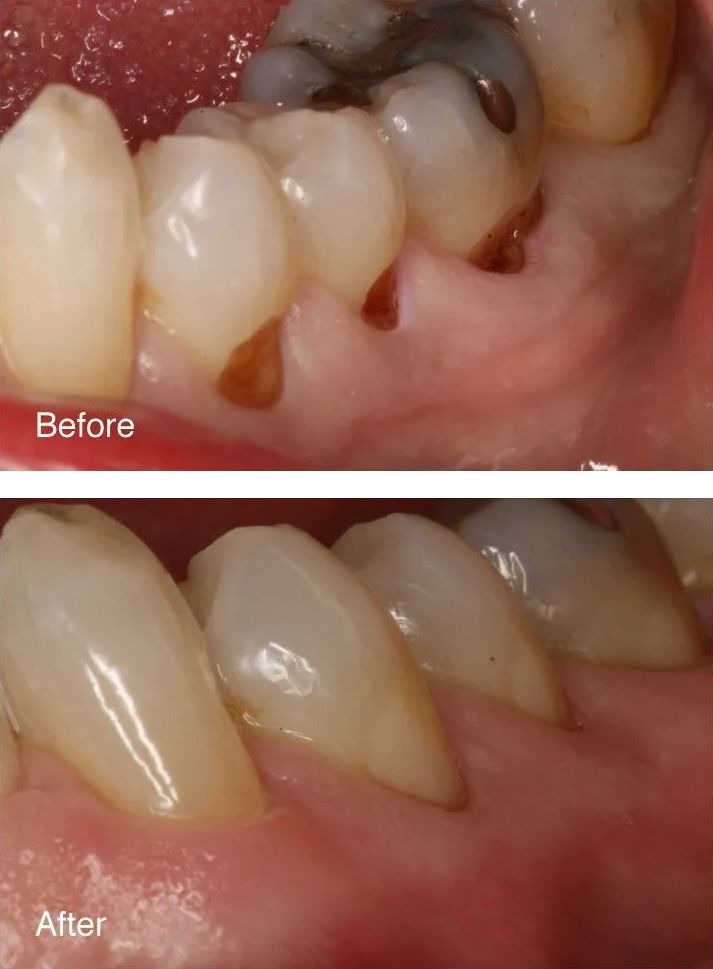
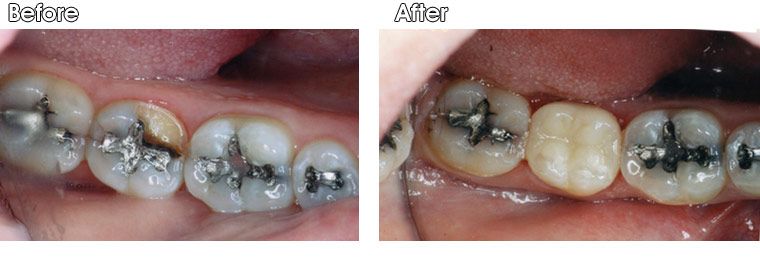
Case 8:

Before - This patient has three teeth he wants restored. One has an old porcelain fused to metal crown on it that shows a dark, unsightly line near the gums. The other two are heavily restored with fillings, and the teeth are weak and subject to fracture.
After - Dr. Jack Hosner of Portage, MI placed porcelain crowns on these teeth to protect them from fracture and to improve their esthetics.
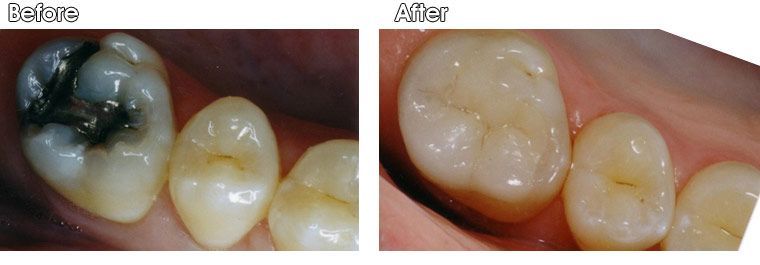
Case 9:
Before - Old and dull composite resin filling on front tooth with poor shape.
After - Dr. Jack Hosner of Portage, MI placed one porcelain crown to improve appearance and protect tooth from fracture.
Case 10:
Before - This patient broke half of his tooth off.
After - Dr. Jack Hosner of Portage, MI restored tooth with a porcelain crown.
Case 11:

Before - Broken tooth with large and defective amalgam fillings and recurrent decay.
During - All defective fillings and decay were removed. Notice the thin and fragile natural tooth structure remaining.
After - New composite resin fillings were bonded to these teeth and then gold crowns were fabricated and cemented over these teeth by Dr. Jack Hosner of Portage, MI to protect them from fracture.
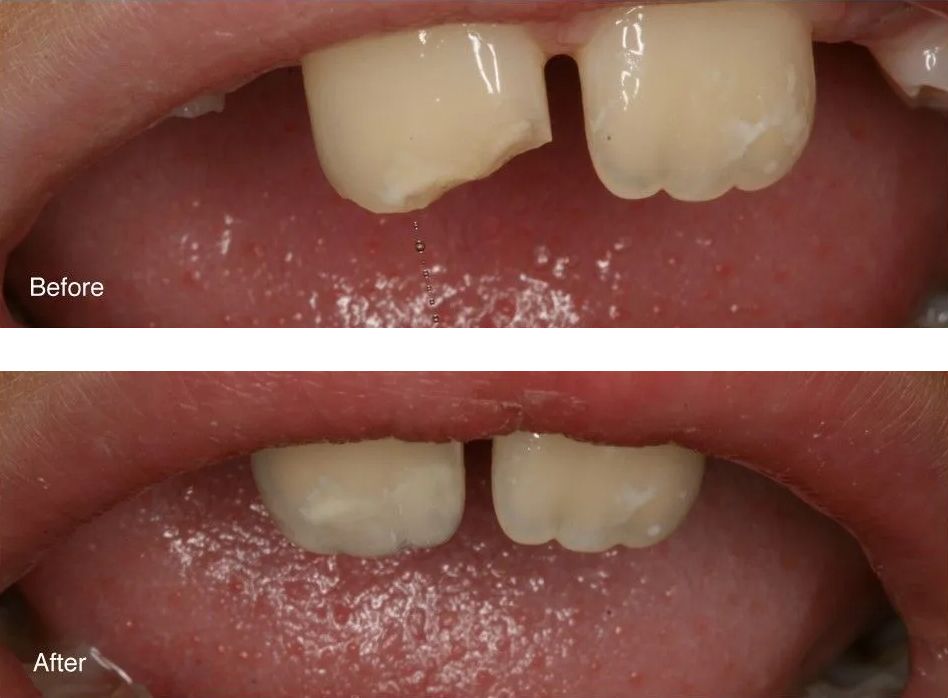
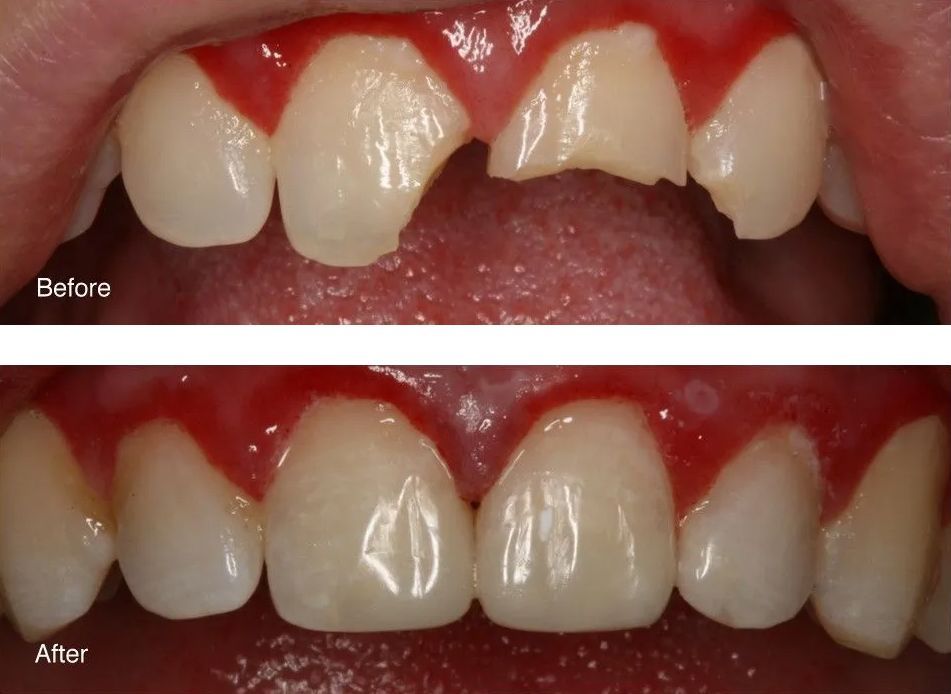
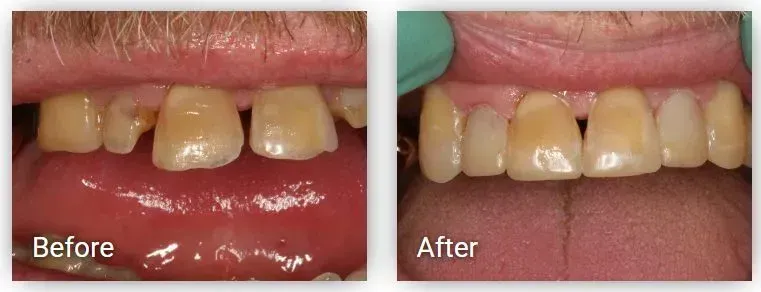
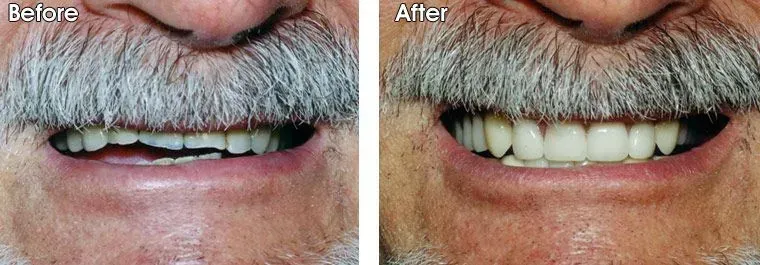
Fractured Teeth
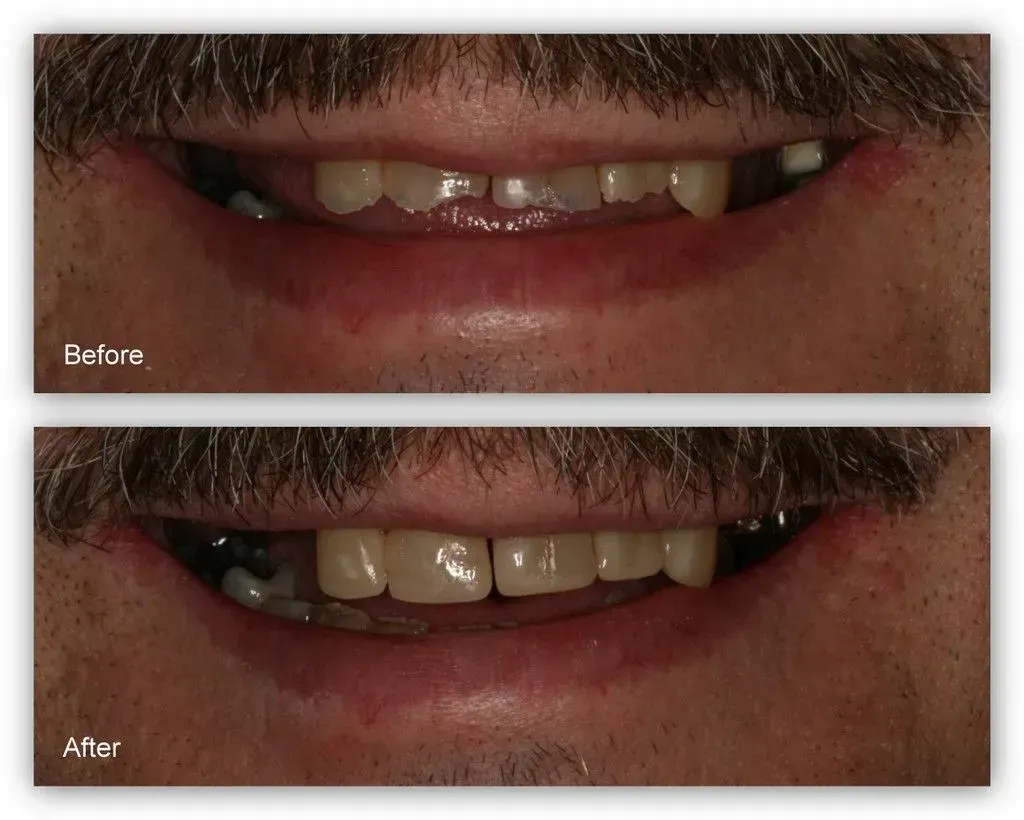
Case 1:
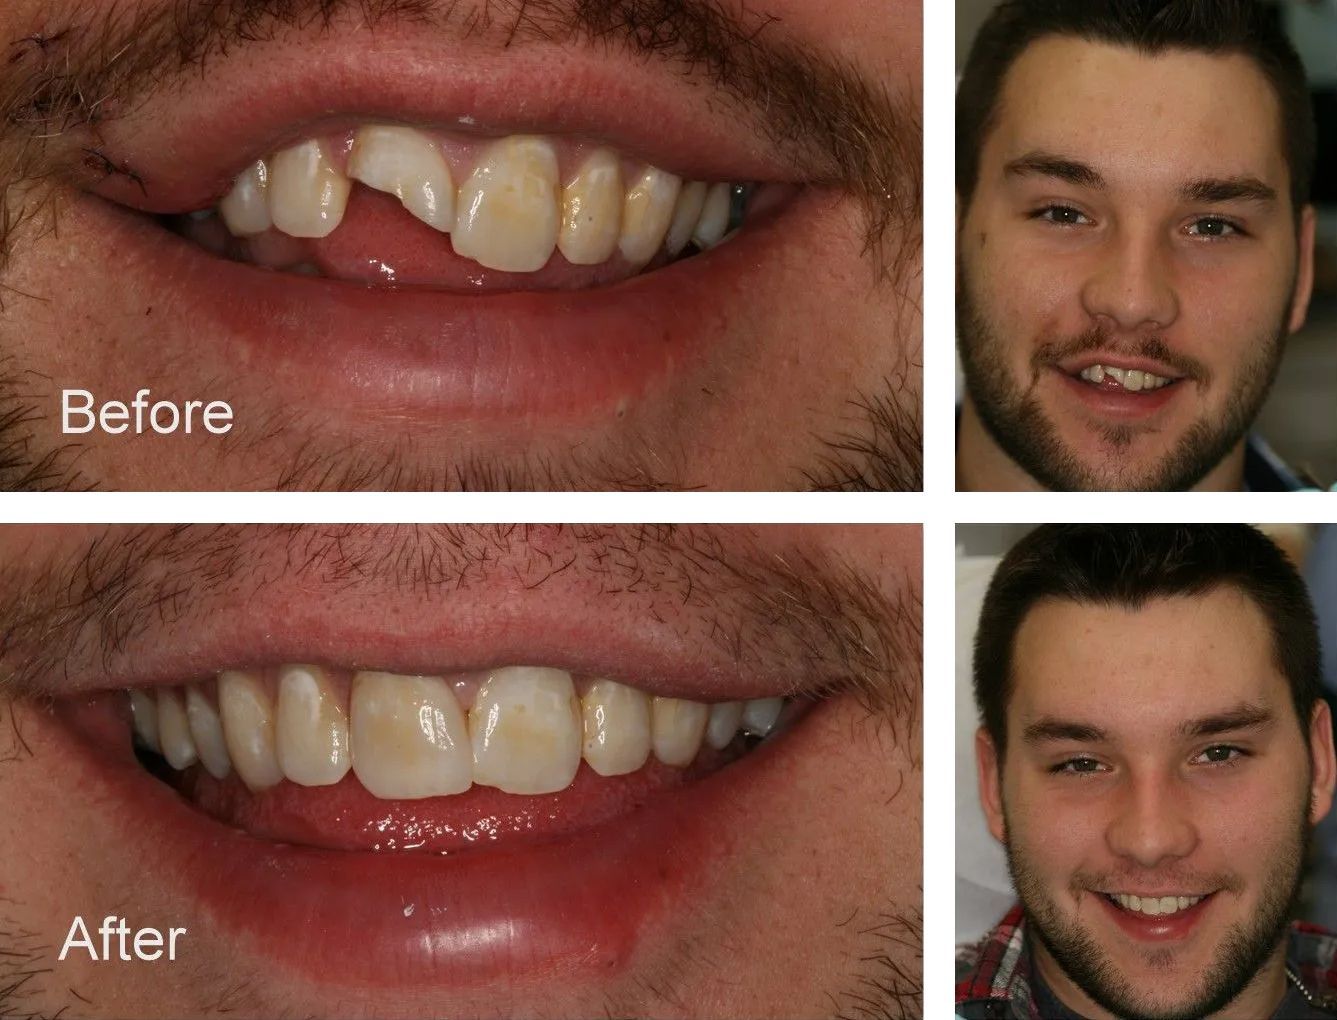
Before - This patient fell and broke three of his front teeth.
After - Comfortably, without the need for anesthetic, and in one appointment, Dr. Jack Hosner of Portage, MI bonded tooth colored composite resin material to the teeth to recreate what had been lost. This picture was taken immediately after treatment.
Case 2:
Before - This patient has a broken old porcelain crown. Notice the monochromatic “dull” appearance of the crown.
After - Dr. Jack Hosner of Portage, MI replaced this crown with a more natural appearing porcelain crown. Notice how it has multiple colors to it and doesn’t look dull.
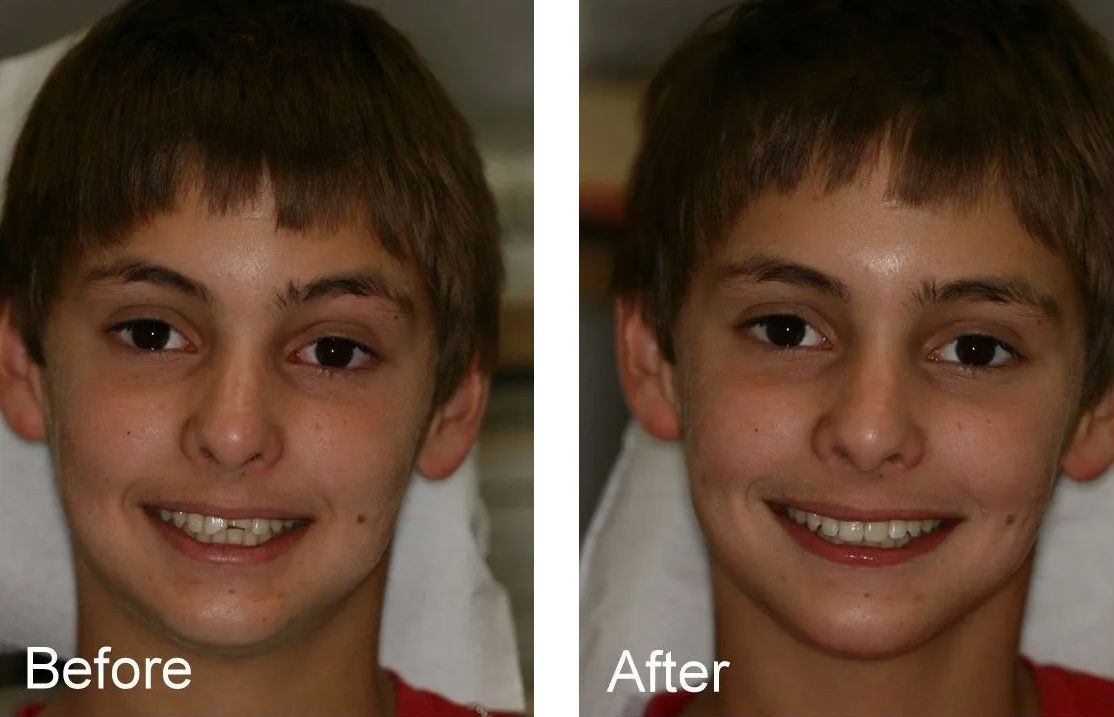
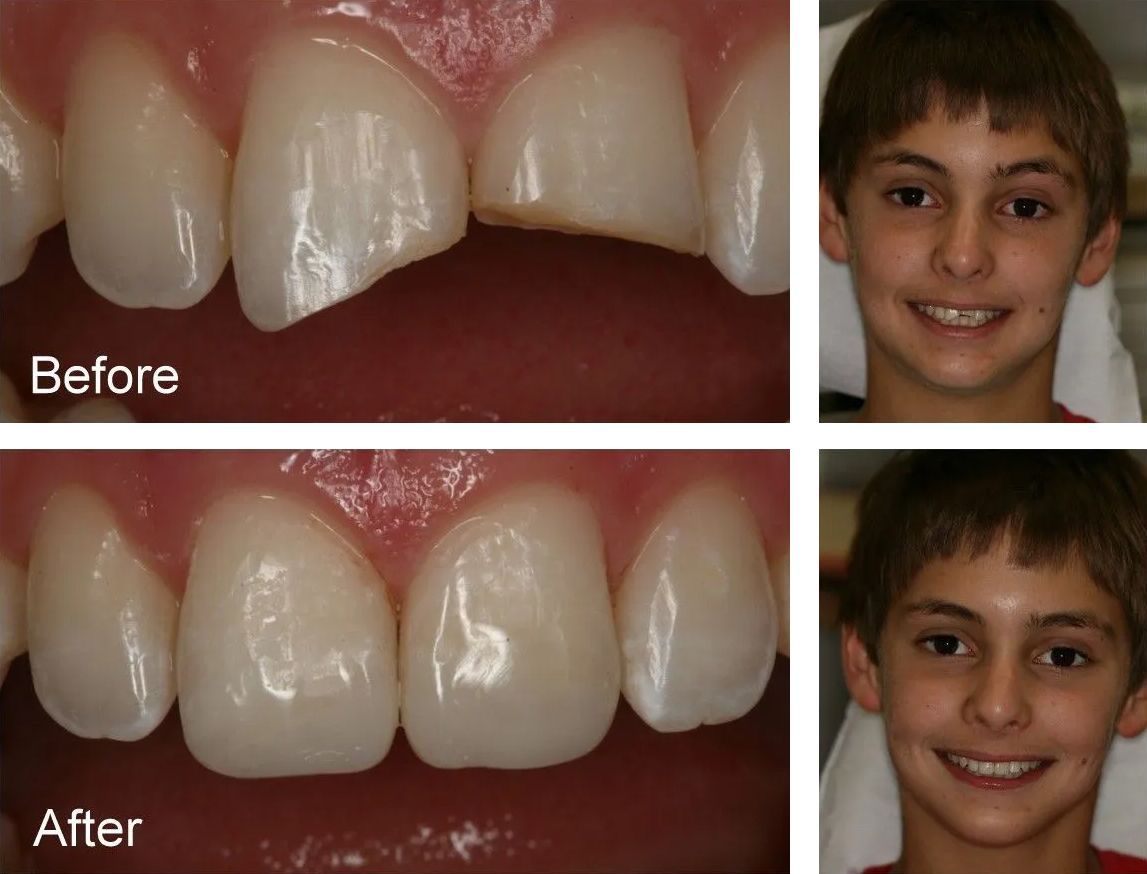
Case 3:
Before - This young 10 year old boy broke his tooth while playing.
After - Dr. Jack Hosner of Portage, MI bonded tooth colored dental material to the tooth to restore natural shape.
Case 4:
Before - This patient broke his two front teeth.
After - Dr. Jack Hosner of Portage, MI bonded a porcelain crown onto this tooth to restore natural form.
Case 5:
Before - This patient broke her upper front tooth.
After - Dr. Jack Hosner of Portage, MI bonded tooth colored dental material to restore tooth back to normal. No pain. Numbing not necessary.
Case 6:
Before - This sixteen year old patient of Dr. Jack Hosner’s fell and fractured her two front teeth. The tooth on the left is fractured into the nerve thus requiring root canal therapy.
After - This photo was taken right after treatment – the same day she came in. Dr. Jack Hosner of Portage, MI performed root canal therapy on the tooth on the left and bonded the patient’s own broken tooth pieces back onto her teeth. * Note, the broken, reattached pieces are dehydrated from being left out of the mouth for an extended period of time, and this is why they appear whiter than the tooth structure that did not break out of the mouth. After 4-6 hours, the patient’s own saliva will rehydrate the tooth structure back to its original color.
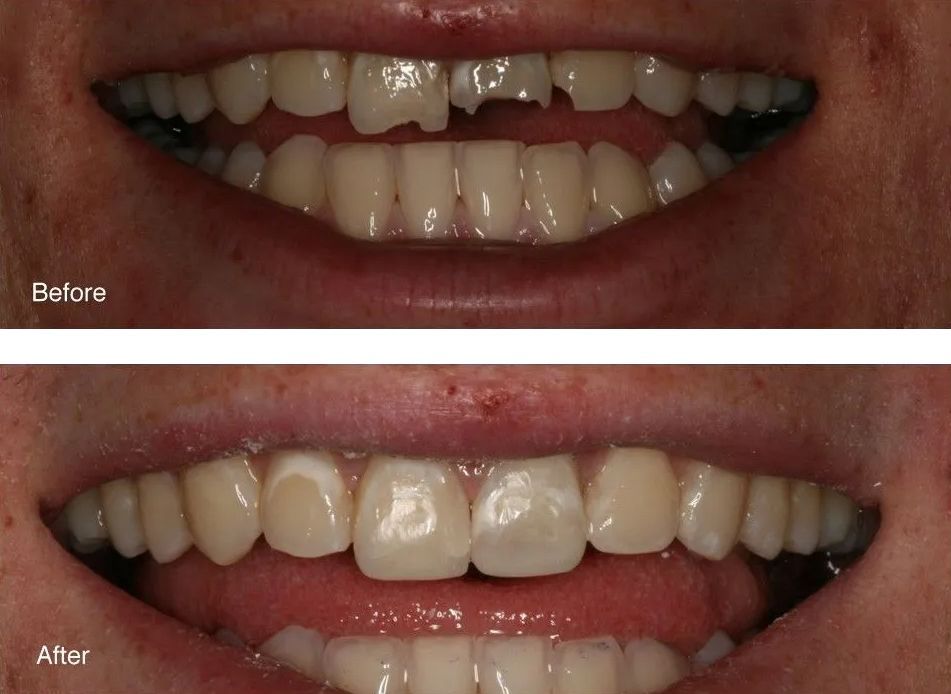
Case 7:
Before - This patient fell and broke three of his front teeth.
After - Comfortably, without the need for anesthetic, and in one appointment, Dr. Jack Hosner of Portage, MI bonded tooth colored composite resin material to the teeth to recreate what had been lost. This picture was taken immediately after treatment.
Case 8:

Before - This patient fell and fractured his upper front two teeth.
After - Dr. Jack Hosner of Portage, MI restored these teeth with bonded composite resin.
Case 9:
Before - Same patient as above fell again fracturing his teeth even worse than before.
After - They were restored back to natural appearance with bonded composite resin by Dr. Jack Hosner.
Case 10:
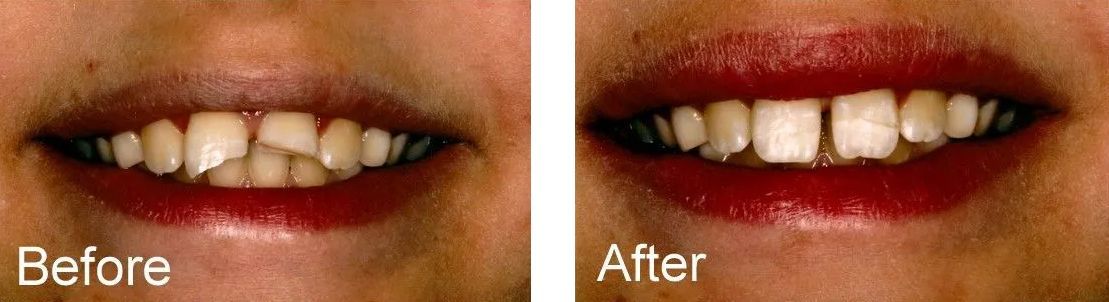
Before - This young man broke his two front teeth and could not find the broken pieces.
After - Composite resin was bonded directly to his teeth by Dr. Jack Hosner of Portage, MI to restore the natural appearance.
Before - This is a close-up of the same patient showing the broken teeth.
After - The artificial, tooth colored composite resin bonded to the teeth and polished by Dr. Jack Hosner of Portage, MI.
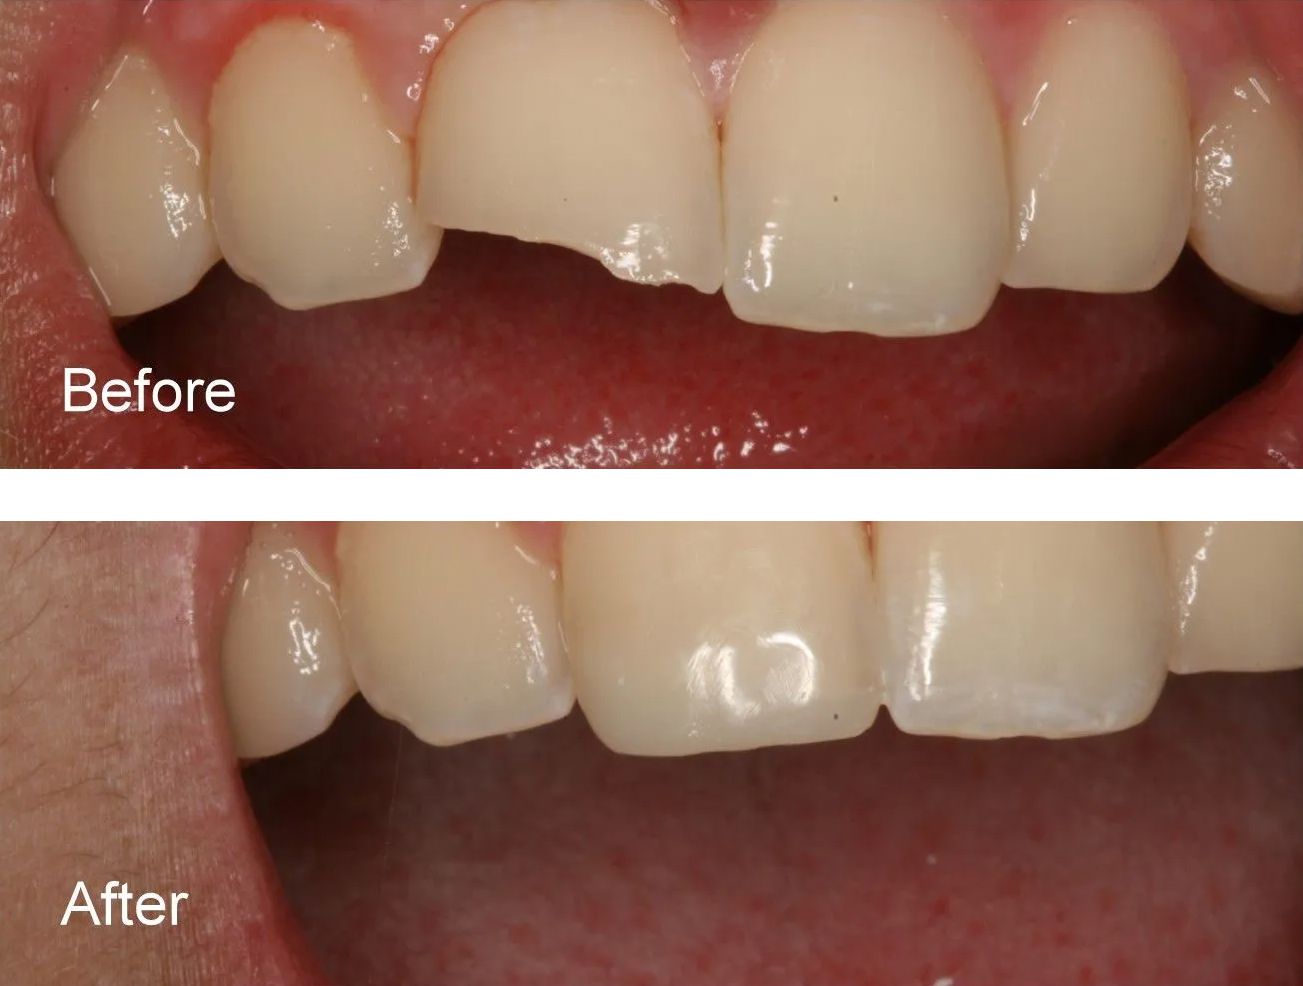
Case 11:
Before - A patient of Dr. Jack Hosner’s from Portage ,MI presented with a chipped upper tooth.
After - Composite resin was bonded to restore natural appearance.
Case 12:
Before - This patient fractured his tooth.
After - Dr. Jack Hosner of Portage, MI repaired the tooth with bonded tooth colored composite.
Case 13:
Before - This young man broke his two front teeth and was able to locate the broken pieces.
After - Dr. Jack Hosner of Portage, MI bonded the broken pieces back onto the two front teeth. Note that the color of the broken reattached tooth pieces are lighter in color. This is because these pieces were left out of the mouth for awhile and became dehydrated. After 4 to 6 hours, the patient’s own saliva will rehydrate these pieces back to their original color.
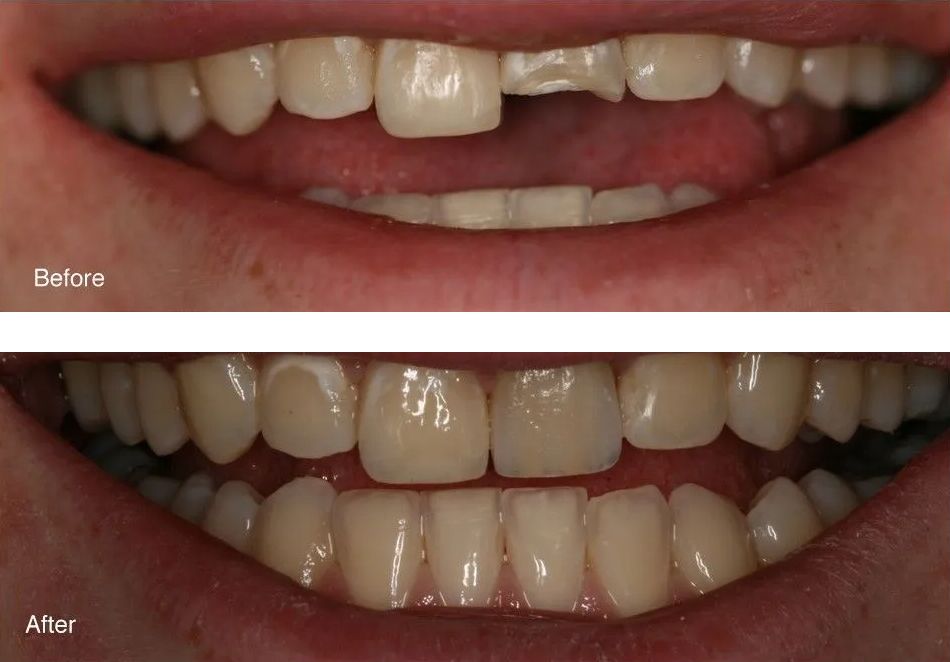
Case 14:
Before - A work accident caused the fracture of this patient’s front tooth. The fractured piece could not be found.
After - Dr. Jack Hosner of Portage, MI placed a porcelain crown over the fractured tooth to restore proper contour and color as well as to protect the tooth from further fracture.

Before - Close-up of fractured tooth.
After -
Close-up of new porcelain crown. Notice all the color detail in this crown to make it look like a natural tooth.
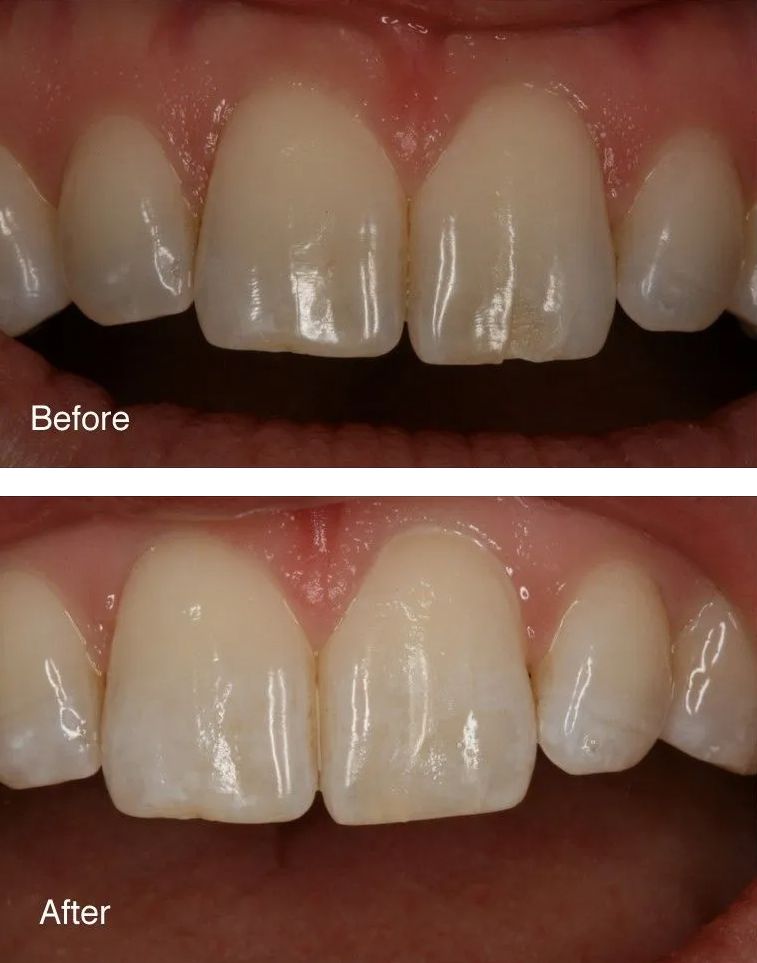
Case 15:
Before - Broken tooth.
After - Dr. Jack Hosner of Portage, MI restored this tooth with an all porcelain crown. Notice how much more natural this crown looks vs. the whiter opaque crown on the right side of the two front teeth which is a porcelain fused to metal crown.
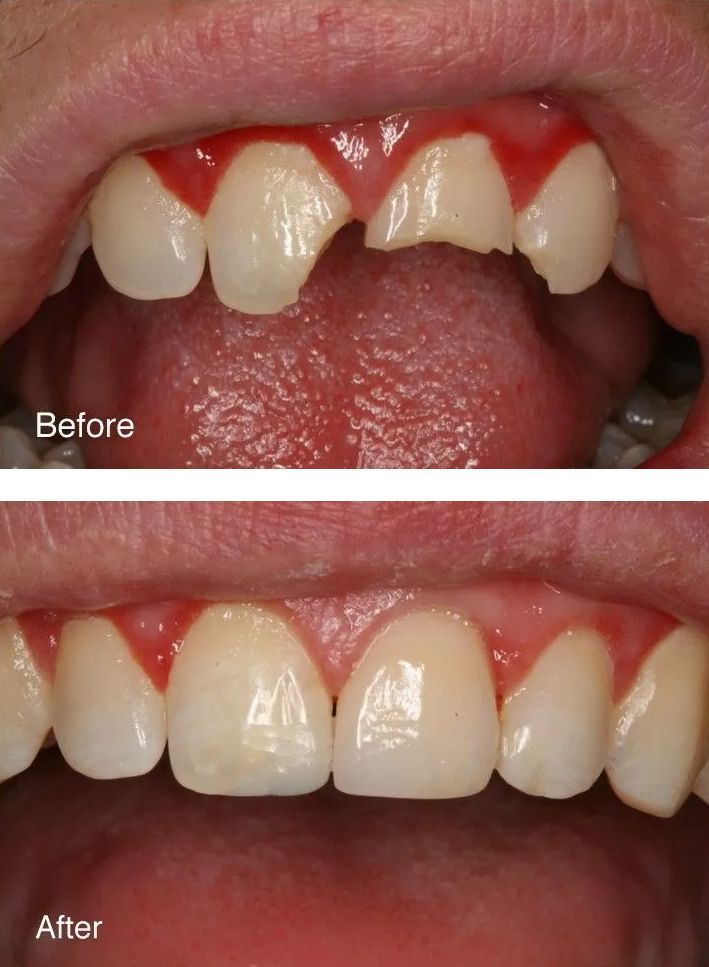
Case 16:
Before - This patient has two front broken teeth
After - Porcelain crowns were placed by Dr. Jack Hosner of Portage, MI.
Close-Up of Above
Case 17:

Before - Big area of tooth missing.
After - Composite resin tooth colored material was bonded to the defect, contoured and polished to resemble a natural tooth shape by Dr. Jack Hosner of Portage, MI.
Case 18:
Before - This patient fractured his front tooth.
After - Dr. Jack Hosner of Portage, MI bonded a porcelain crown onto this tooth.
Case 19:
Before - This patient chipped her front tooth by accidentally biting on a fork.
After - Tooth was repaired comfortably, without anesthesia with bonded and polished material by Dr. Jack Hosner of Portage, MI.
Case 20:
Before - Broken two front teeth.
After - Tooth colored restorative material was bonded and polished to the left tooth. The tooth on the right required a full porcelain crown. Dr. Jack Hosner of Portage, MI delivered all of this treatment.
Case 21:
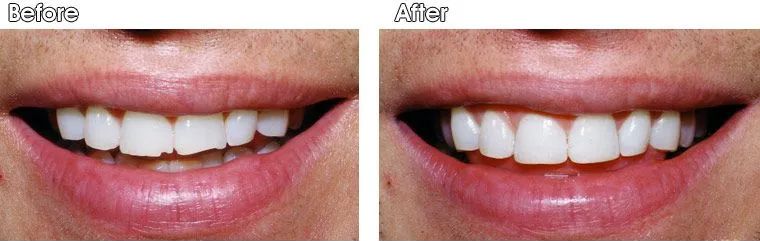
Before - Small chips on upper front teeth.
After - Dr. Jack Hosner of Portage, MI bonded tooth colored fillings to restore natural appearance.
Case 22:

Before - This patient has chipped and irregularly shaped front four teeth.
After - Dr. Jack Hosner of Portage, MI bonded composite resin to these teeth and also reshaped them.
Case 23:
Before - Small chips on upper front teeth.
After - Dr. Jack Hosner of Portage, MI bonded tooth colored fillings to restore natural appearance.
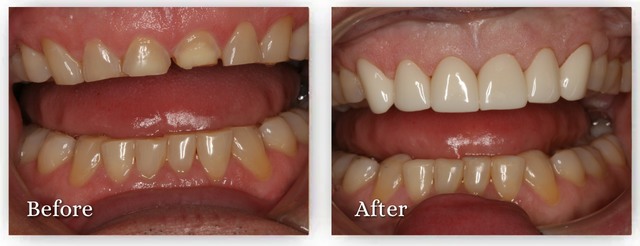
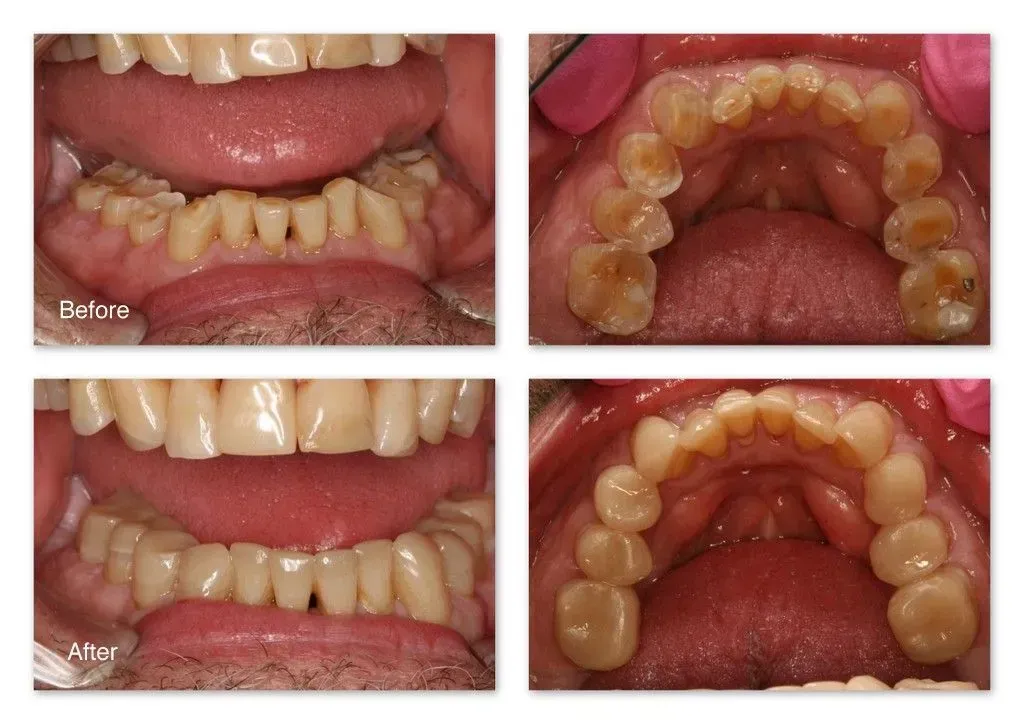
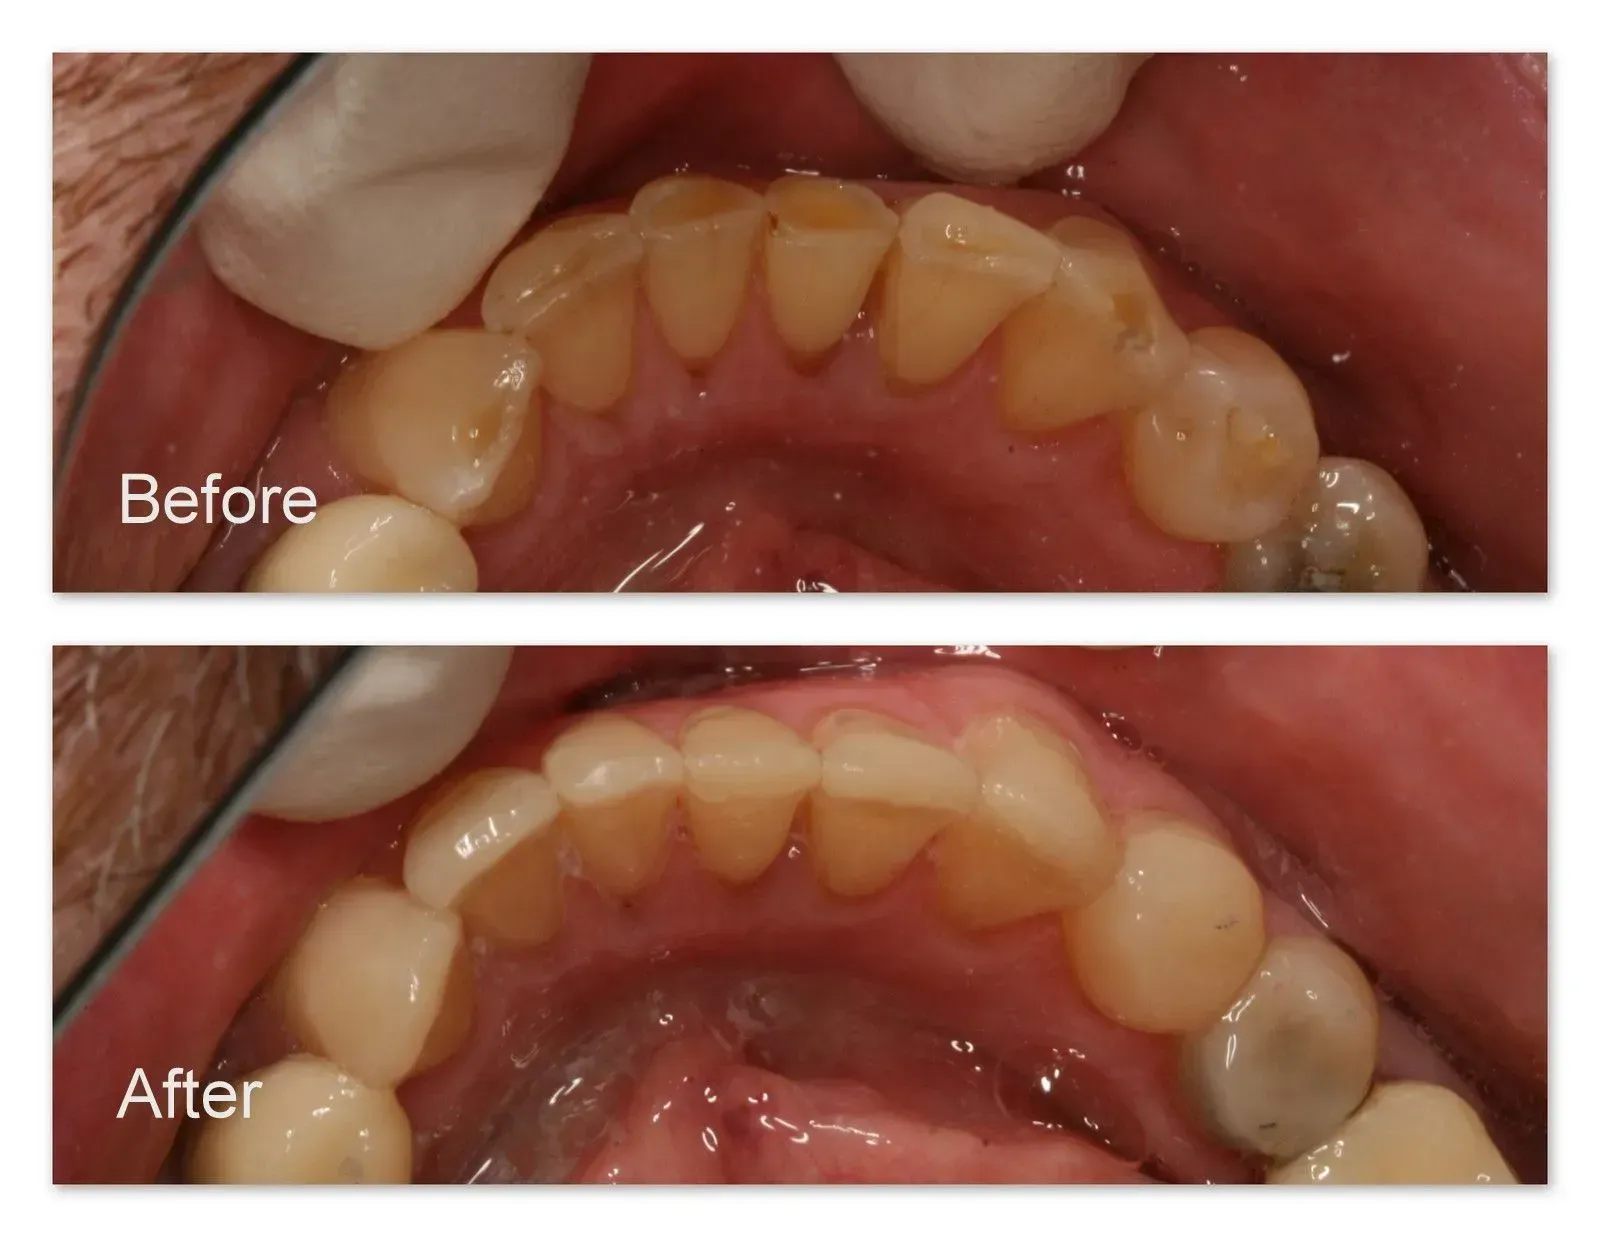
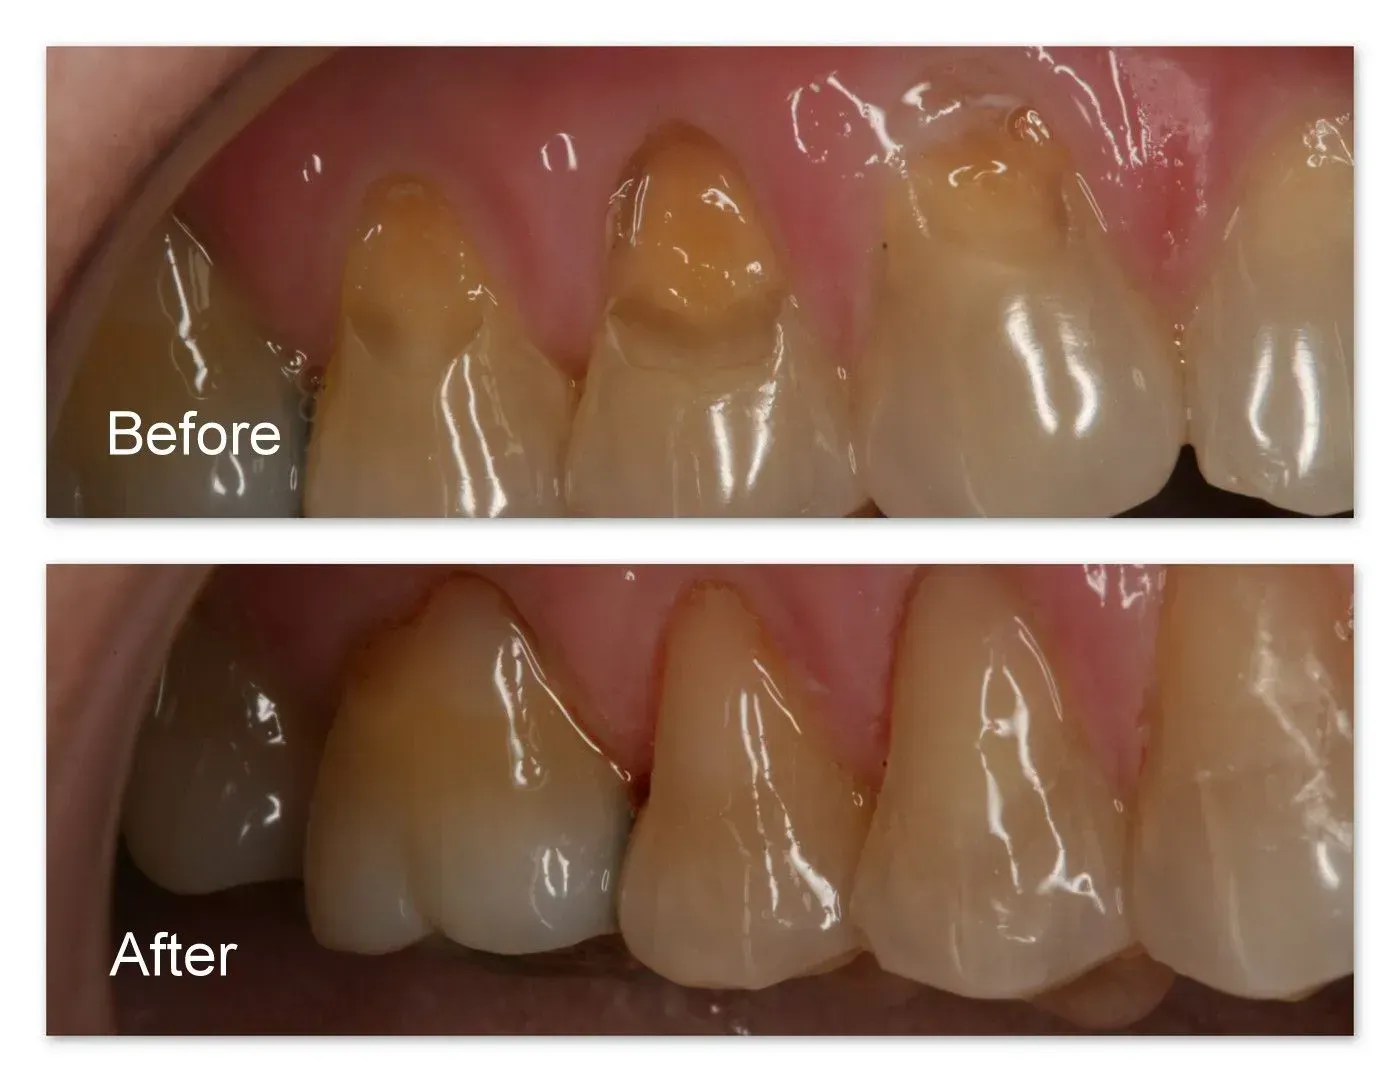
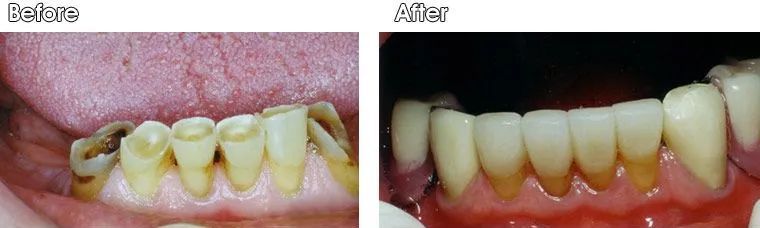
Worn Teeth
Case 1:
Before - This patient has moderate to severe wear on his upper and lower front six teeth. Notice how short they are.
After - Dr. Jack Hosner of Portage, Michigan, placed zirconia crowns on the upper front six teeth for maximum protection from wear and improved aesthetics. Tooth colored fillings/composite resin were bonded to the edges of the lower teeth to protect. (This can be seen in the after photo below)
Same case as above with the lips retracted.
Case 2:
This patient presented to the office with advanced wear on most of his teeth. As a result of the wear, the teeth have shifted. Orthodontic treatment was provided to move the teeth back to their original positions, and Dr. Jack Hosner of Portage Michigan bonded composite resin (a tooth colored restorative material) to the worn surfaces for proper tooth size and shape. That is what these photographs show. The orthodontics can now be completed. Final crowns for all of the teeth can be made and placed on the teeth following the completion of orthodontics. That has not been done yet in this case.
Front View with Lips Retracted
Upper Arch View
Lower Arch View
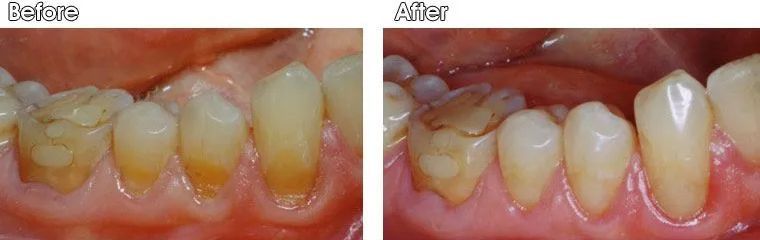
Case 3:
Before - This patient has severe wear on his upper and lower front teeth.
After - Dr. Jack Hosner of Portage Michigan bonded composite resin (tooth colored restorative material) to all of the worn surfaces. For maximum long term durability, the patient will have crowns placed on these teeth.
Lower View
Case 4:
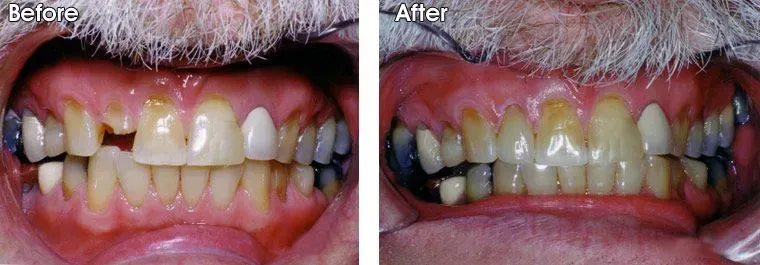
Before - This patient suffers from severe erosion of his teeth.
After - Dr. Jack Hosner of Portage, MI bonded composite resin tooth colored restorations to restore and protect all of his worn teeth which greatly improved his overall esthetics. and cost less than half of porcelain crowns.
Case 5:
Before - This patient had extremely worn teeth.
After - Dr. Jack Hosner of Portage, MI bonded composite resin to restore and protect these teeth which improved overall esthetics.
Case 6:
Before - This patient has severe wear on his teeth. He wanted them restored but could not afford porcelain crowns.
After - Dr. Jack Hosner of Portage, MI bonded composite resin tooth-like material directly onto his teeth in one appointment without anesthetic to build up and replace the lost or worn tooth structure. Porcelain crowns can be done later as finances allow.
Case 7:
Before - A close-up of the worn lower teeth.
After -
These teeth have been restored by Dr. Jack Hosner of Portage, MI.
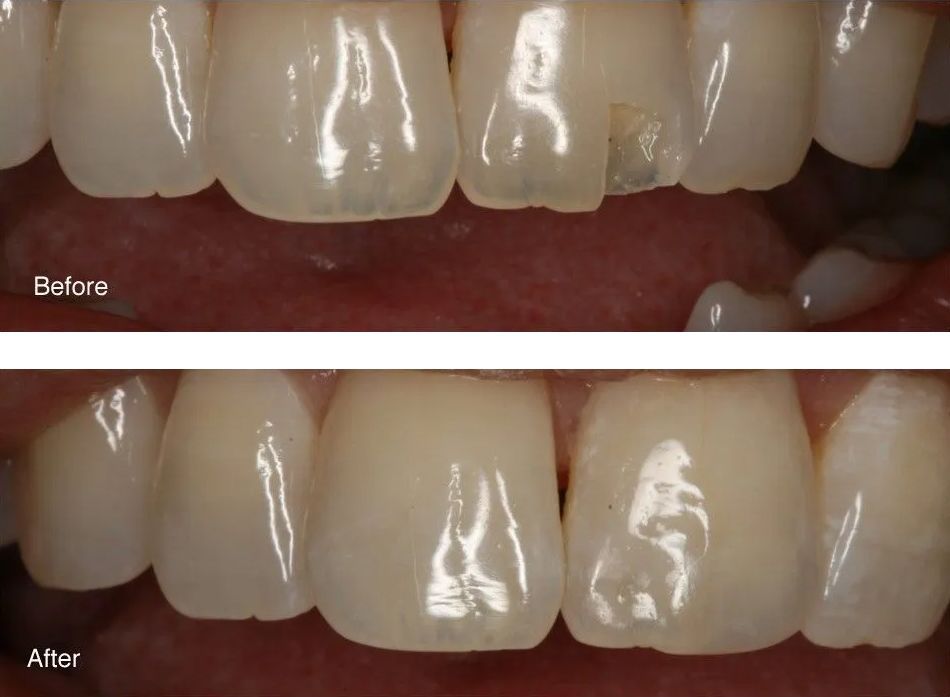
Case 8:
Before - Wear and erosion has taken it’s toll on these teeth.
After - Dr. Jack Hosner, D.D.S. of Portage, MI bonded light colored composite resin material to restore the damaged teeth, and as a result, improve their appearance. The restoration of these teeth was done all in one office visit.
Case 9:
Before - Extremely worn/eroded teeth.
After - Immediately after restoration by Jack Hosner of Portage, MI.
Case 10:
Before - Moderate to severe wear at the necks of these teeth.
After - Immediately after restoring with composite resin by Dr. Jack Hosner of Portage, MI
Before - Side view of the same case as above showing the wear.
After - Side view of the teeth after restorations
Case 11:

Before - This patient has chipped and irregularly shaped front four teeth.
After - Dr. Jack Hosner of Portage, MI bonded composite resin to these teeth and also reshaped them.
Case 12:
Before - This patient didn’t like the worn surfaces of her upper front two teeth.
After - Dr. Jack Hosner of Portage, MI bonded restorative material to the worn surfaces to reestablish proper form and esthetics.
Case 13:

Before - This patient has worn/eroded teeth.
After - Dr. Jack Hosner of Portage, MI bonded these teeth with composite resin thus protecting them from further wear and erosion. This greatly improved the appearance of the teeth as well.
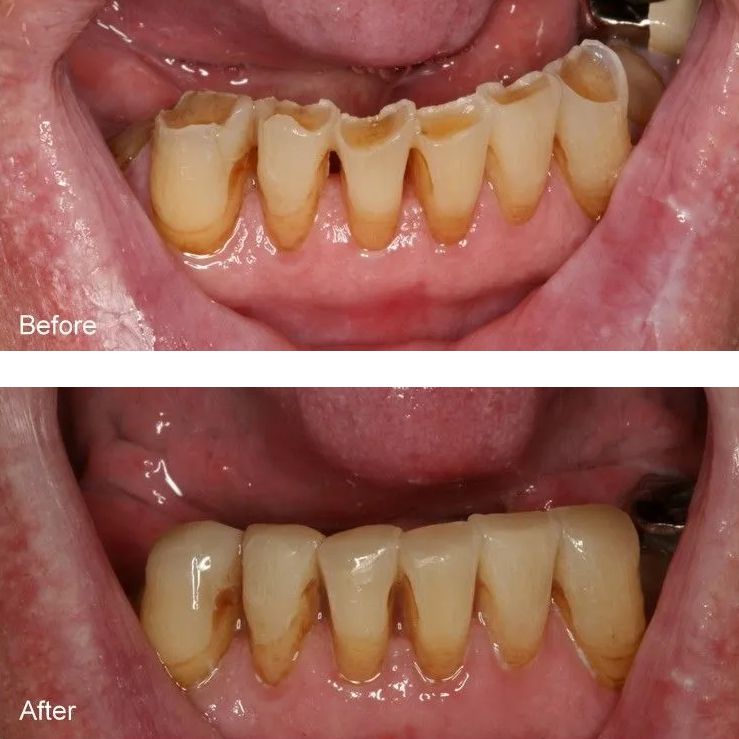
Case 14:
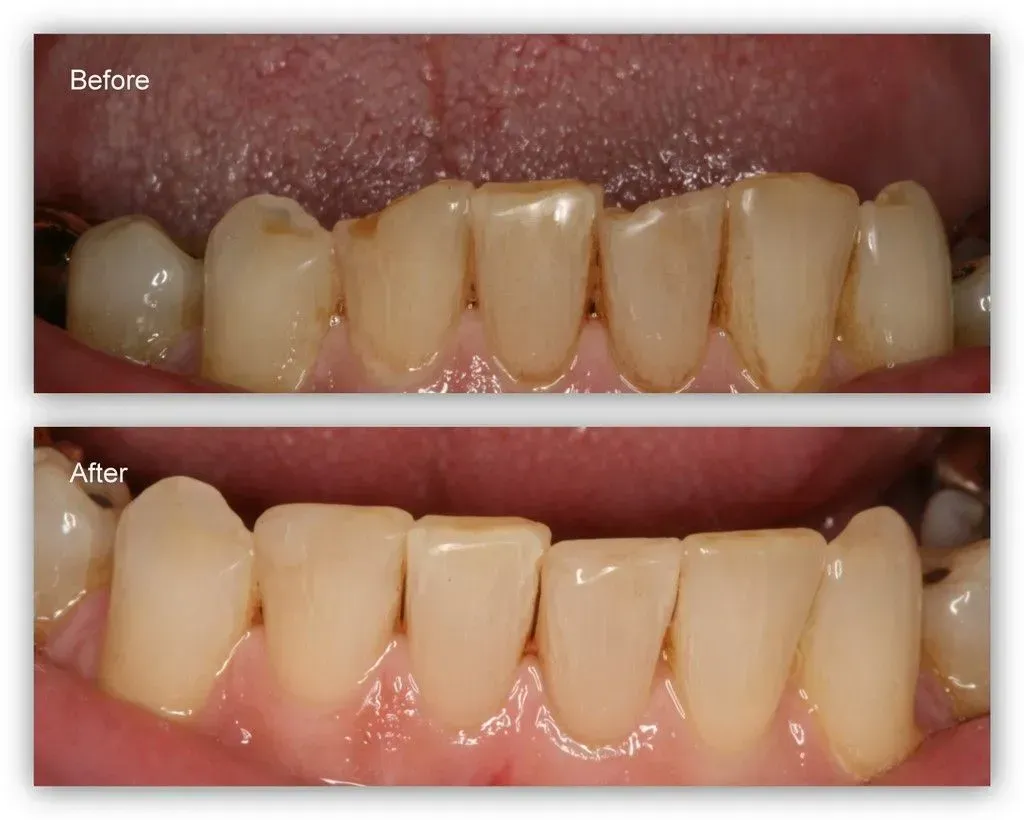
Before - This patient has moderate to severe wear/erosion on his lower front teeth.
After - Dr. Jack Hosner of Portage, MI bonded composite resin to these teeth to restore, shape, and protect from further wear.
Case 15:
Before - This patient has severe wear and erosion on his upper front teeth
After - Dr. Jack Hosner bonded composite to the four front teeth to restore appearance and protect from fracture.
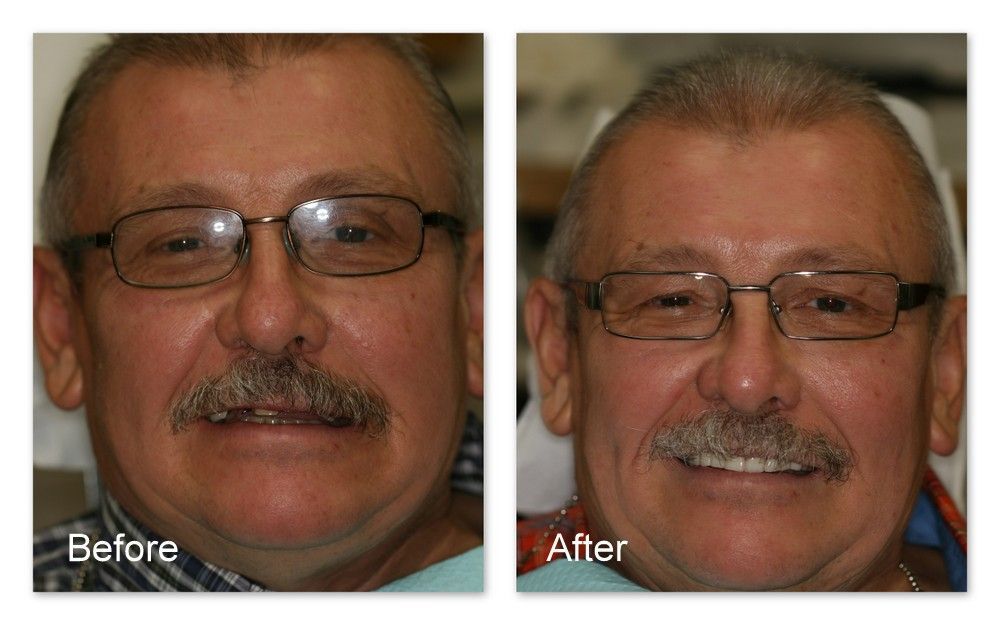
Case 16:

Before - This patient presented to Dr. Jack Hosner of Portage, Michigan with severely worn teeth due to acid erosion from a habit of sucking on lemons. Finances were limited. He could not wear a traditional removable partial denture due to excessive bone growth on the sides of his mouth nor could he afford to restore his teeth to normal or to have dental implants.
During - Dr. Hosner built up two of his teeth on the right side to help retain a removable “Snap-on Smile”.
After - This picture shows the “Snap-on Smile” in place. It grabs onto the existing teeth and is inserted and removed by the patient.
Before - Same as Above
After - Same as Above
Here is a picture of the “Snap-on Smile” out of the mouth.
Case 17:
Before - This patient’s front teeth were worn on the front surfaces.
After - Dr. Jack Hosner of Portage, MI bonded tooth colored restorative material to these defects to protect the teeth and reestablish normal contours.
Case 18:
Before - Moderate wear/erosion on these teeth.
After - Dr. Jack Hosner of Portage, MI bonded tooth colored restorative material to these defects to protect the teeth and reestablish normal contours.
Case 19:
Before - This patient has severe wear and erosion of his lower front teeth.
After - Dr. Jack Hosner of Portage, MI bonded porcelain crowns onto the four front teeth and porcelain fused to metal crowns were placed on the other two teeth.
Case 20:
Before - This patient has moderate tooth wear/erosion on three teeth at the gum line.
After - Tooth colored fillings were bonded to these defects by Dr. Jack Hosner of Portage, MI to restore lost tooth structure and protect from further destruction.
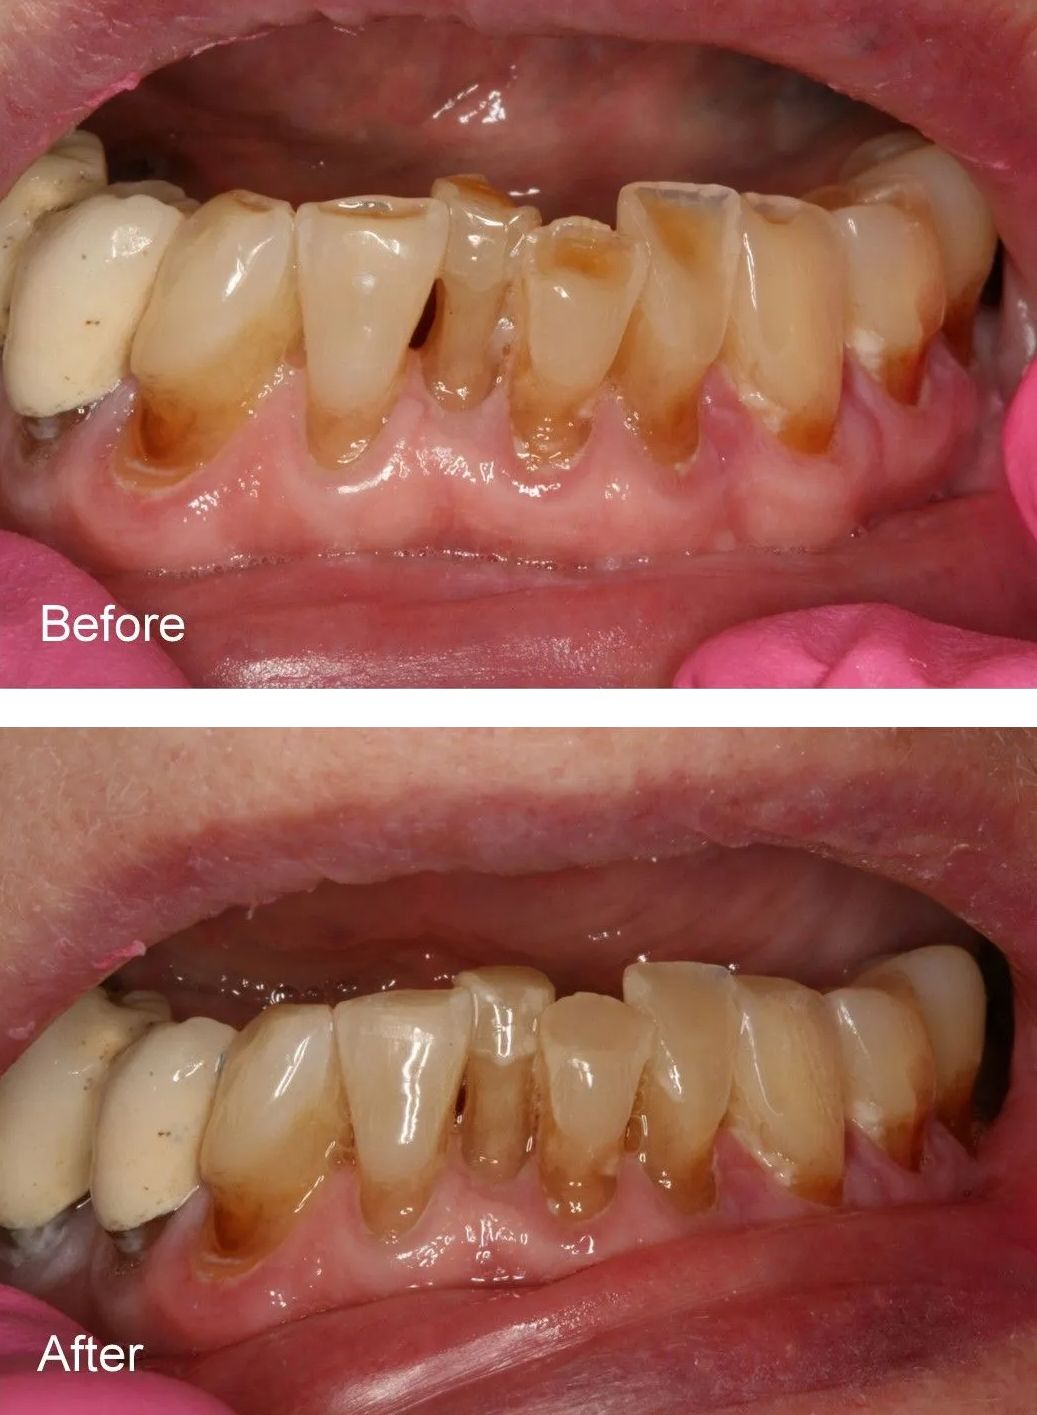
Case 21:
Before - This patient has severe wear on his lower front teeth.
After - In this photo, the teeth have been restored with composite resin by Dr. Jack M. Hosner, D.D.S. of Portage, Michigan. The restorations were contoured/shaped this way in order for them to bite properly with his upper teeth. The position of the upper teeth dictates the shapes of the lowers.
Case 22:
Before - These teeth are moderately worn down.
After - Dr. Jack Hosner, D.D.S. from Portage, Michigan bonded composite resin as much as possible to protect worn surfaces from further wear. More material could not be added due to the patient’s “bite” (i.e. the way the upper and lower teeth contact one another).
Case 23:
Before - This patient wanted his 6 front teeth looking a little bit straighter.
After - Dr. Jack Hosner, D.D.S. of Portage, Michigan bonded composite resin to the top edges of these teeth and also recontoured some of the teeth to straighten things up more.
Case 24:
Before - These upper teeth as viewed from inside the patient’s mouth are severely worn.
After - Dr. Jack Hosner, D.D.S. of Portage, Michigan bonded composite resin to restore the worn teeth and protect them from further wear.
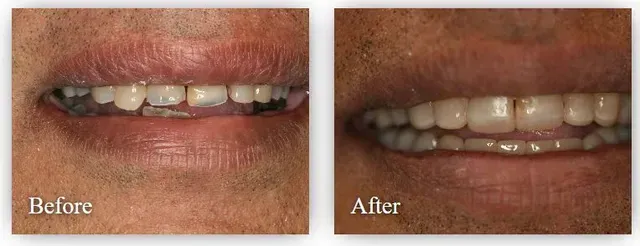
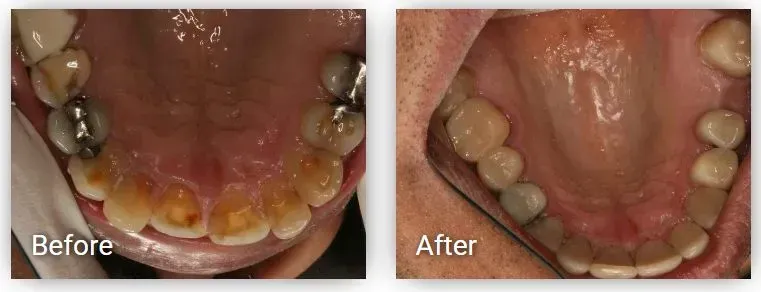
Tooth Colored Fillings
Composite Resin (Tooth Colored Fillings) is a dental restorative material made of acrylic resin mixed with finely ground glass like particles. The composite resin matches the color of your existing teeth, and can be used to restore a decayed tooth or repair a defect.
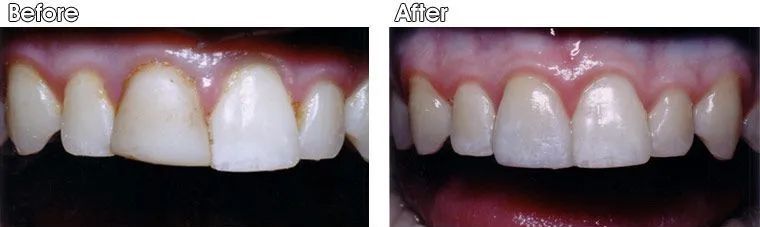
Case 1:
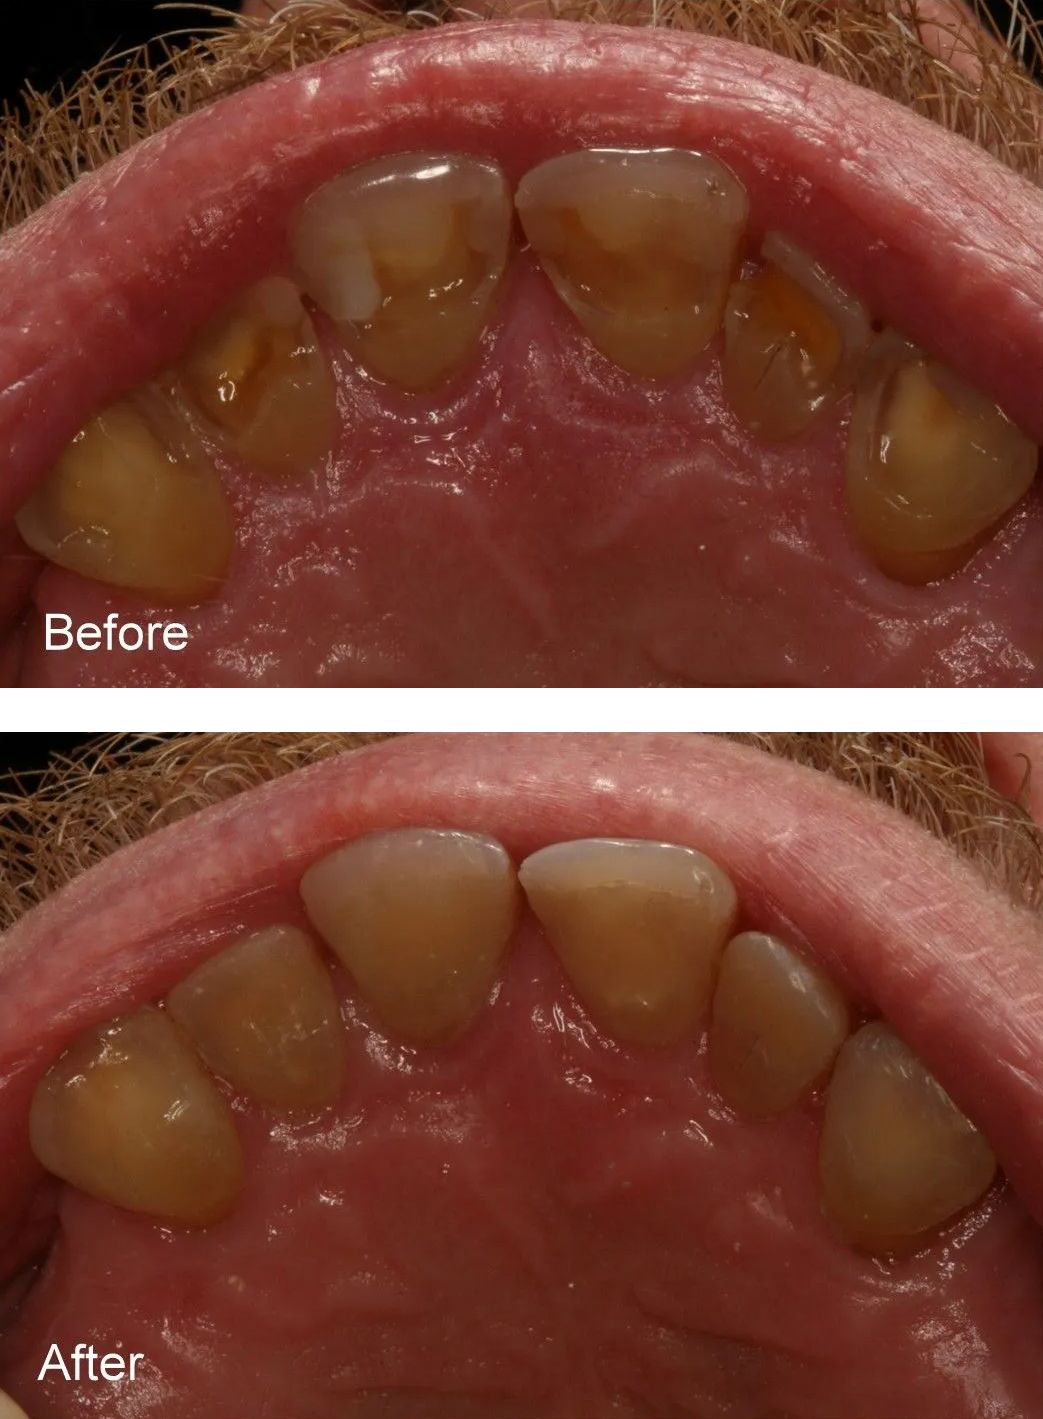
Before - This patient has severe decay on his upper front teeth and severe gum inflammation/infection on his lower front.
After - The decay was removed from the upper teeth, and composite resin restorations were placed by Dr. Jack Hosner of Portage Michigan. The lower teeth were cleaned allowing the gum tissue to heal.
Case 2:
Before - Severe decay was removed from these teeth resulting in very thin and fragile natural tooth structure remaining.
After - Dr. Jack Hosner of Portage, MI bonded tooth colored fillings to these areas to restore these teeth to natural form.
Case 3:
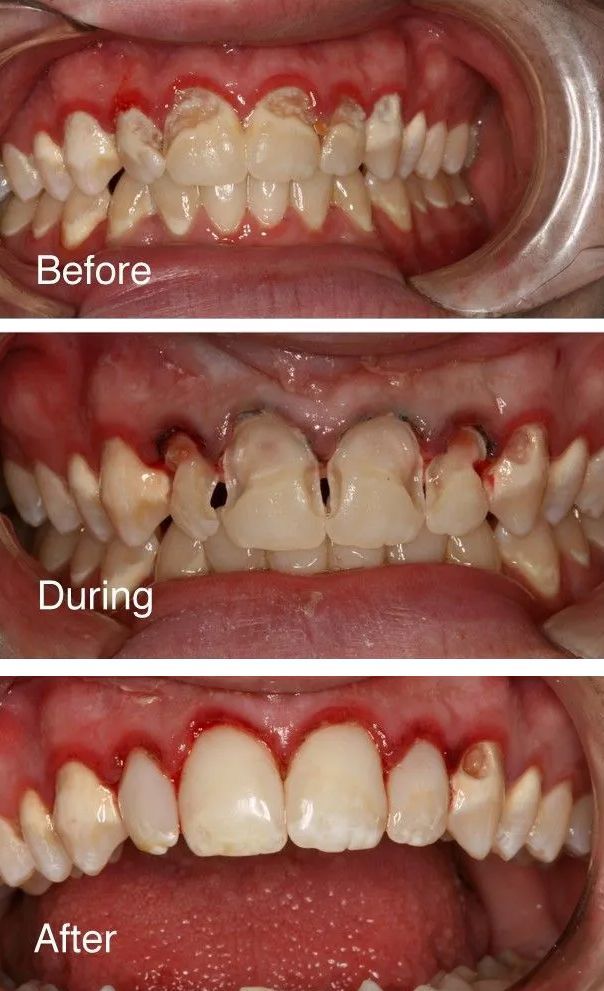
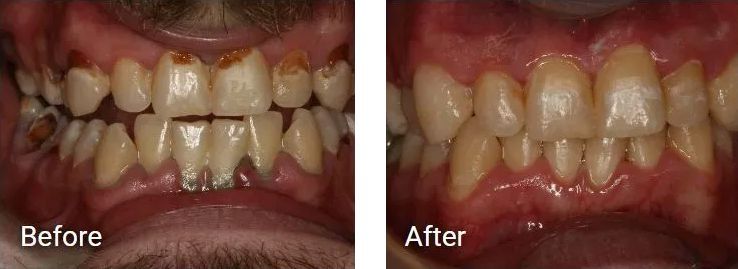
Before - This patient has severe decay on his teeth as a result of frequent sugar beverage drinking – pop.
During - In this picture, you can see that Dr. Jack Hosner of Portage, MI has removed all of the decay from the four front teeth.
After - This is immediately after restoring these teeth with tooth colored composite resin material.
Case 4:
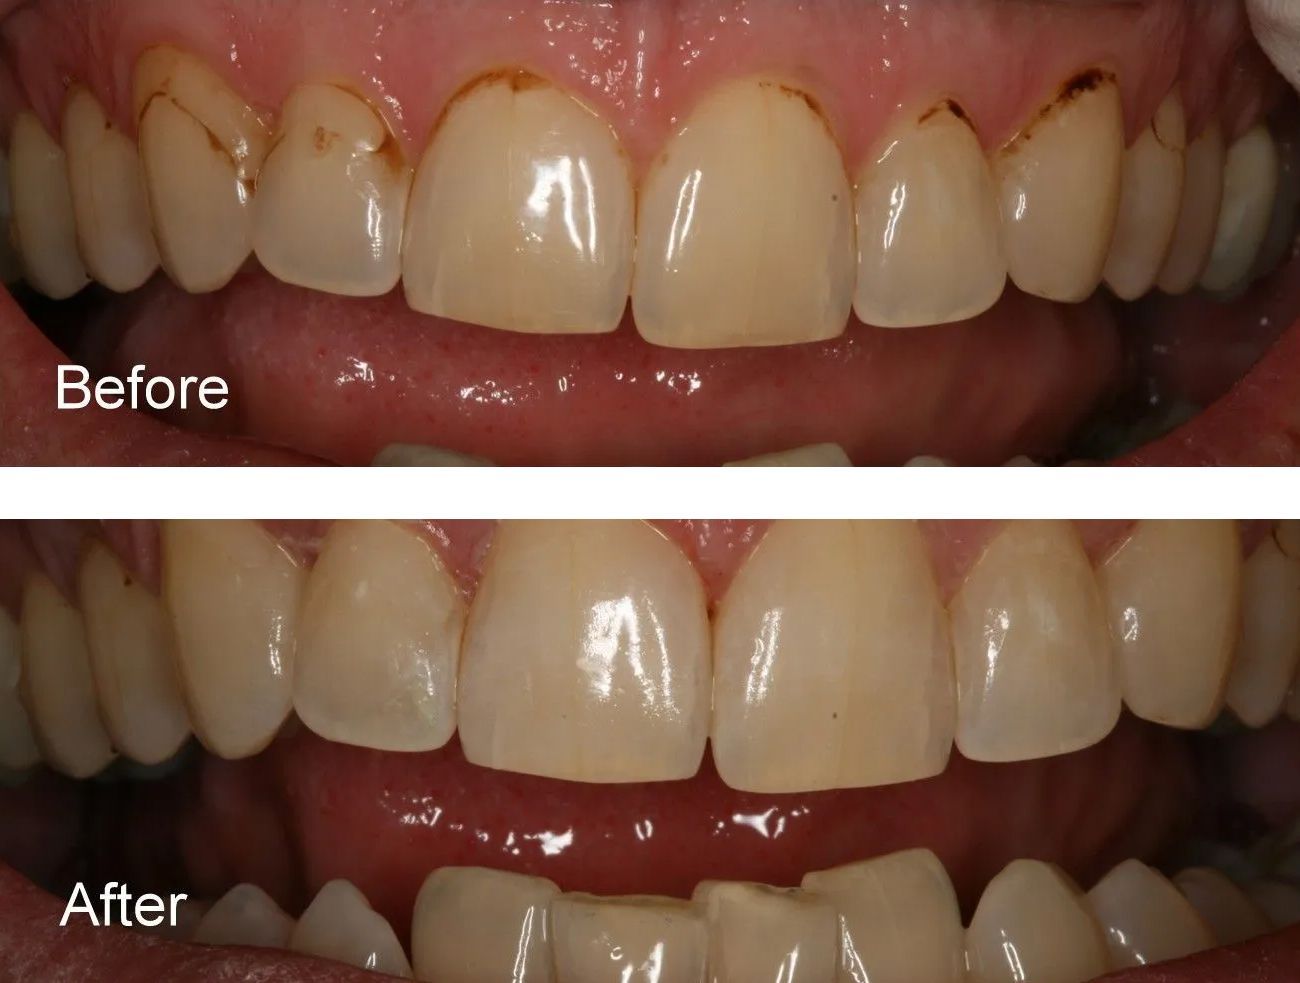
Before - Staining, decay, and old fillings were present on these teeth.
After - This is what they looked like immediately after Dr. Jack Hosner of Portage, MI restored them with composite tooth-colored fillings.
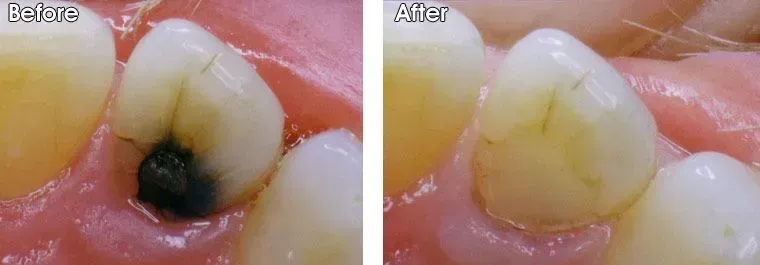
Case 5:
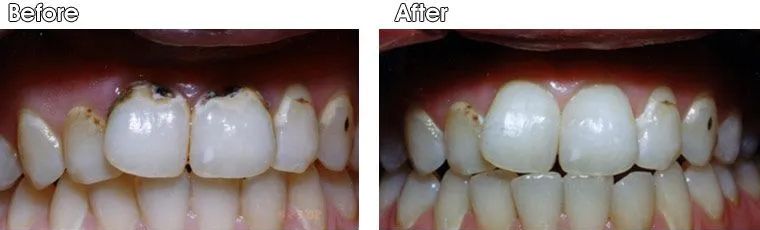
Before - Severe decay on two upper front teeth
After - Dr. Jack Hosner of Portage, MI removed all of the decay and bonded composite fillings to restore natural appearance.
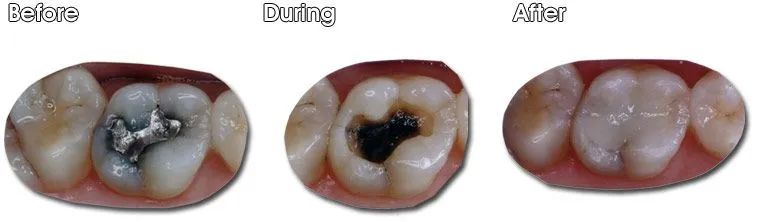
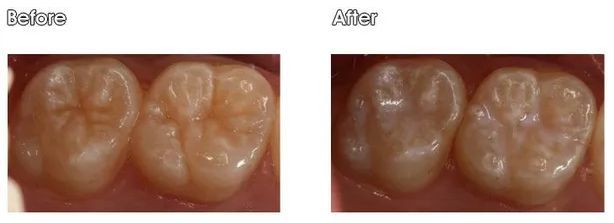
Case 6:

Before - Large cavity in back tooth.
During - Decay was cleaned out.
After - Composite resin was bonded to restore tooth by Dr. Jack Hosner of Portage, MI.
Case 7:
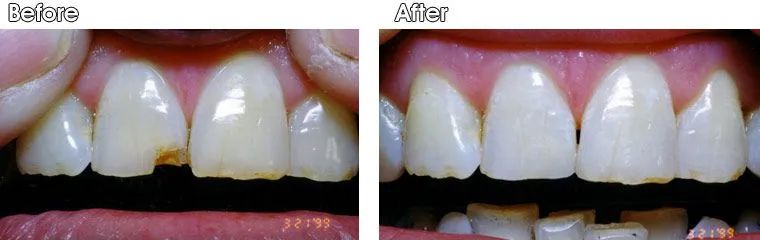
Before - This patient of Dr. Jack Hosner’s of Portage, MI did not like the gray appearance of her old amalgam filling.
After - The filling was removed and replaced with a bonded composite resin filling.
Case 8:
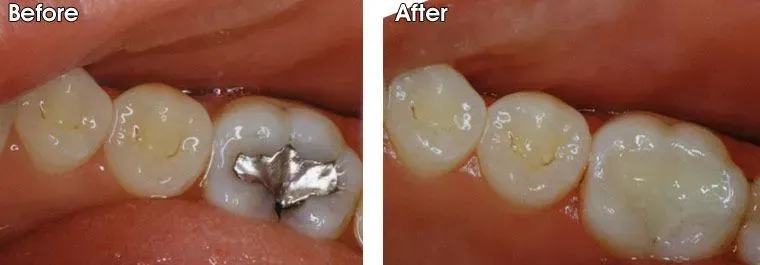
Before - This patient didn’t like the dark gray appearance of this amalgam filling.
During - Dr. Jack M Hosner, DDS of Portage, MI removed the old amalgam filling and decay. Notice how the old amalgam filling has stained the tooth darker.
After - A new directly bonded composite resin filling was placed.
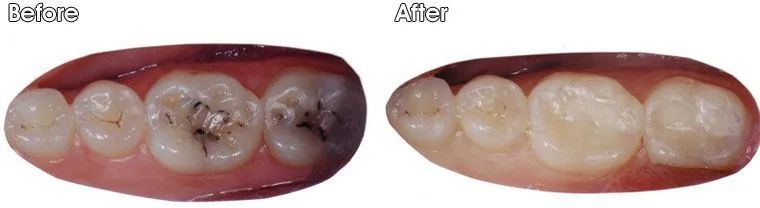
Case 9:
Before - Recurrent decay around an old amalgam (silver) filling
After - Decay was cleaned up and a new tooth colored filling was bonded into the tooth by Dr. Jack M. Hosner, DDS of Portage, MI.
Case 10:
Before - This old amalgam filling caused a lot of dark staining and crack formation on this tooth.
After - Dr. Jack M. Hosner of Portage, MI removed the amalgam filling and stain and replaced it with a composite resin bonded filling.
Case 11:
Before - Decay (cavities) and holes of wear/erosion on these two molars
After - Decay was removed, and bonded tooth colored fillings were placed by Dr. Jack Hosner of Portage, MI to restore decayed and worn tooth structure.
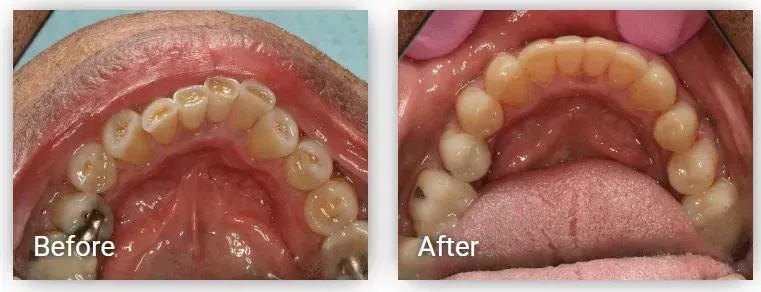
Case 12:

Case 13:
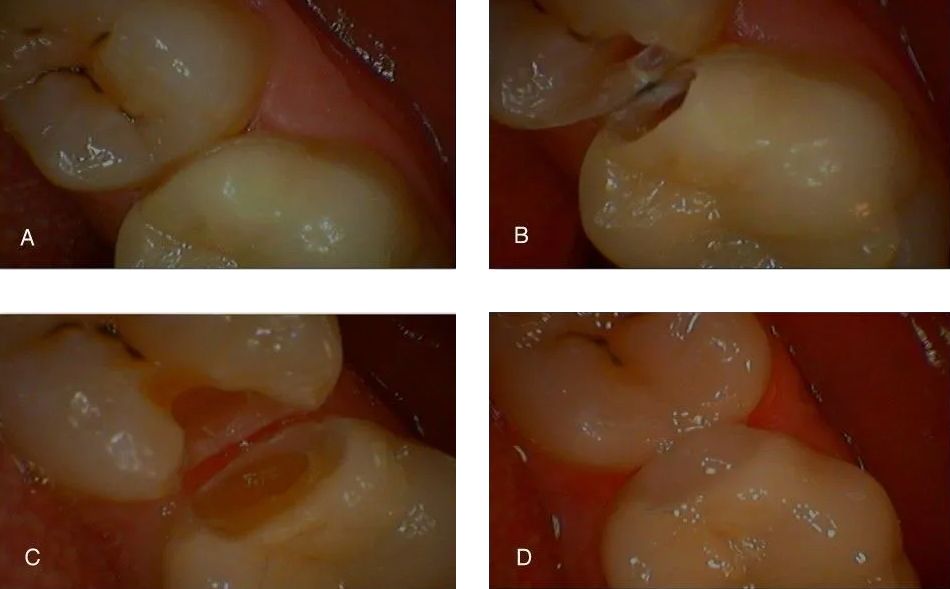
A - There are cavitiies on the sides of these teeth, inbetween the teeth, that you cannot see when looking at them directly. You can only see these cavities on an x-ray of the teeth.
B - Now that we have cut into the teeth you can see the dark brown decay.
C - This picture shows the teeth after all of the decay has been cleaned out by Dr. Jack Hosner of Portage, MI.
D - The fillings have been placed.
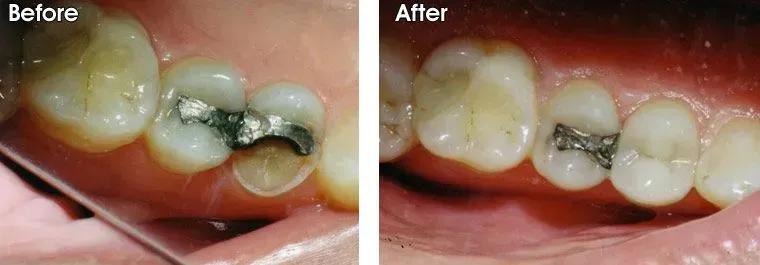
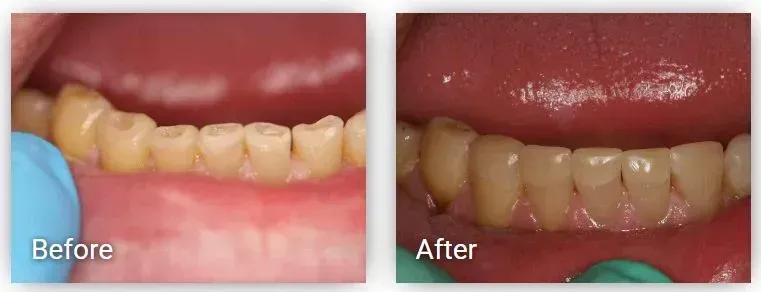
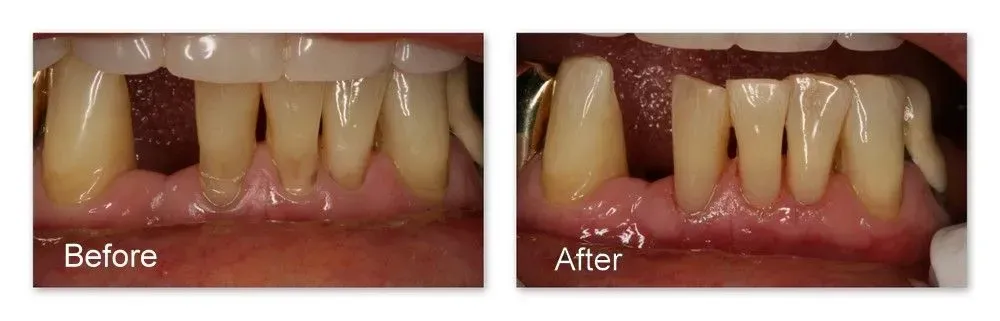
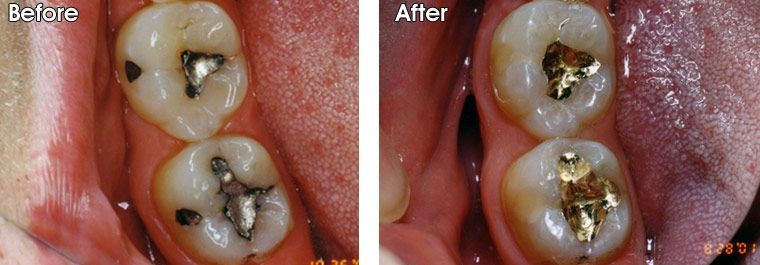
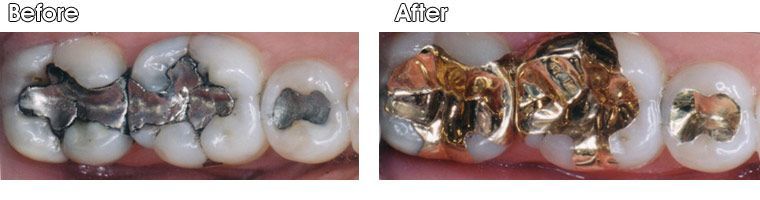
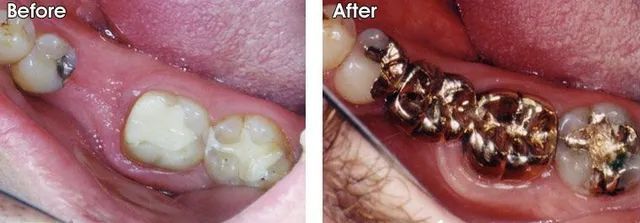
Gold
Case 1:
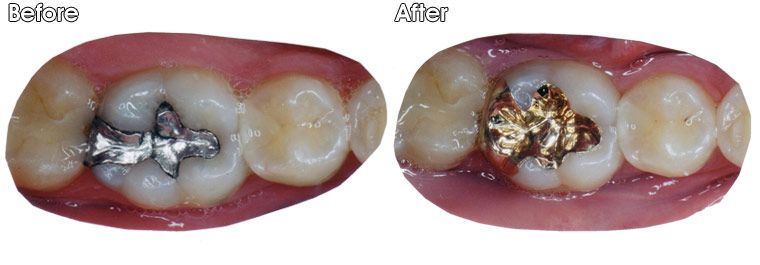
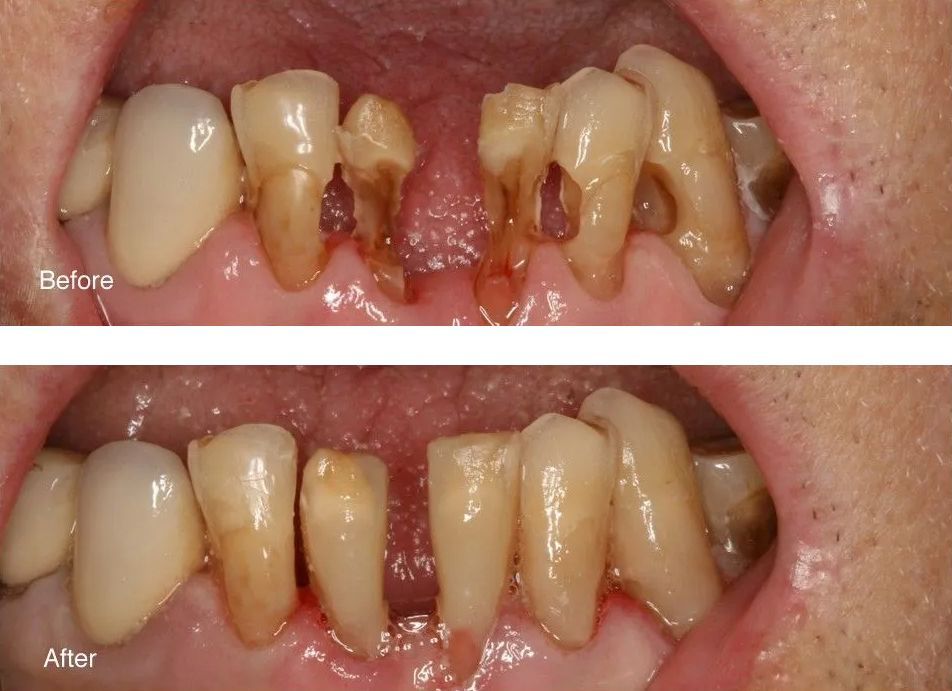
Before– This tooth has an old and defective amalgam restoration (silver filling) on it.
After– Dr. Jack Hosner removed the defective filling and replaced it with a gold onlay.
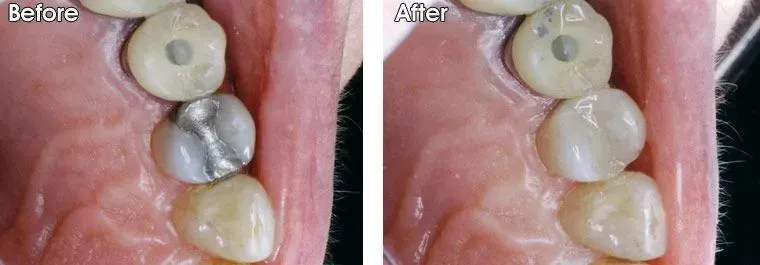
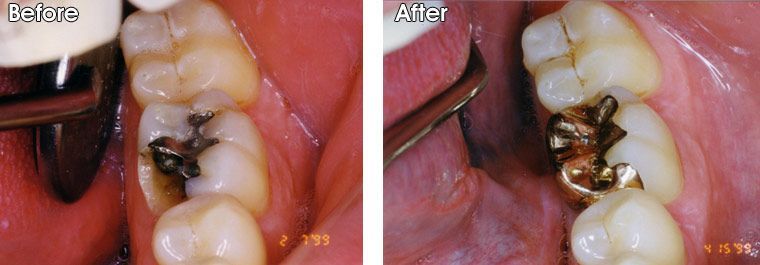
Case 2:

Before– Thin and weak natural tooth structure with recurrent decay
After– Gold onlays placed by Dr Jack Hosner of Portage, MI.
Case 3:
Before– Tooth was broken.
After– Dr. Jack Hosner of Portage, MI restored tooth with a gold onlay.
Case 4:

Before– Broken, decayed and weak back two teeth
During– All old fillings and decay have been removed
After– Dr. Jack Hosner of Portage, MI filled teeth with bonded composite resin, and then placed gold crowns to protect them from fracture.
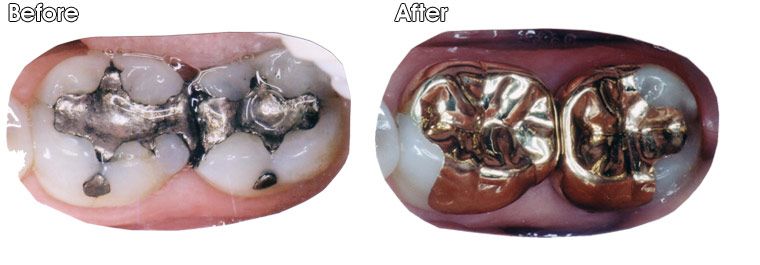
Case 5:

Before– Large decay was removed.
After– Dr. Jack Hosner of Portage, MI restored tooth with a gold onlay.
Case 6:
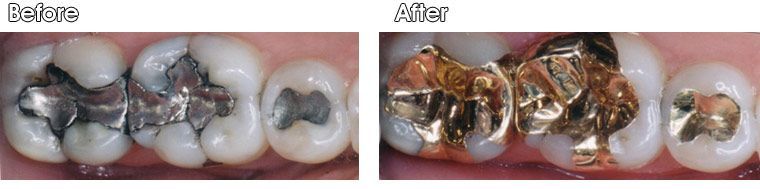
Before– Recurrent decay around old defective silver fillings.
After– Dr. Jack Hosner of Portage, MI restored the back two teeth with gold onlays. He placed a gold inlay on the other tooth.
Case 7:

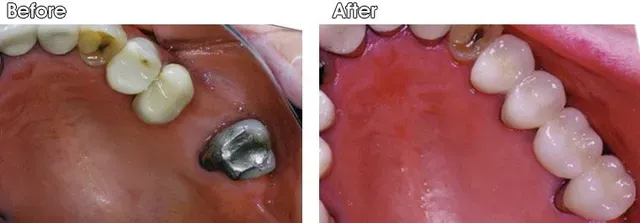
Before– This Patient is missing one back tooth.
After– A 3-unit gold bridge and a single gold inlay were placed by Dr. Jack Hosner of Portage, MI.
Case 8:
Before– Recurrent decay around old defective silver fillings.
After– Gold inlays were placed on the tops of these teeth by Dr. Jack Hosner of Portage, MI.
Onlays
Case 1:
Before– This patient of Dr. Jack Hosner’s of Portage, MI broke a quarter of her tooth off and the other quarter part of tooth next to it was cracked and going to break off soon.
After- The old amalgam (silver filling) was removed and ultimately, the tooth was restored with a porcelain onlay.
Case 2:
Before– Very weak and fragile tooth structure on the upper left part of your screen
After– Dr. Hosner of Portage, MI removed the old failing silver filling and ultimately restored this tooth with a porcelain onlay to protect that part of the tooth from fracture.
Case 3:

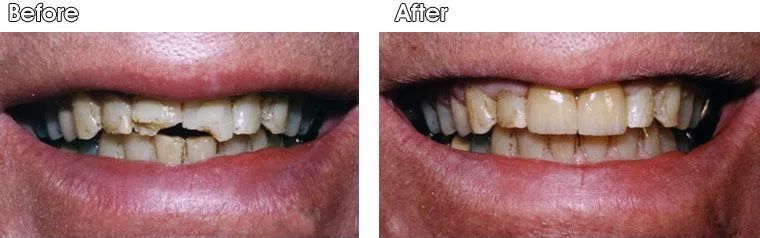
Before– Large silver filling with half of the tooth broken.
During– Dr. Jack Hosner of Portage, MI removed the old silver filling and cleaned the tooth.
After– Ultimately, the tooth was restored with a porcelain onlay.
Case 4:

Before– Cracked and leaking old silver filling.
After– Filling was replaced with a gold onlay by Dr. Jack Hosner of Portage, MI.
Case 5:

Before– Patient came to Dr. Jack Hosner of Portage, MI to fix a broken tooth.
After– Tooth was restored with a gold onlay; the most durable material there is.
Case 6:

Before– Large cavity was cleaned out by Dr. Jack Hosner of Portage, MI.
After– The tooth was restored with a gold onlay.
Case 7:
Before– Large and defective silver fillings with decay around them.
After– Dr. Jack Hosner of Portage, MI restored teeth with gold onlays.
Case 8:
Before– Large and defective silver fillings with decay around them.
After– Dr. Jack Hosner of Portage, MI restored teeth with gold onlays.
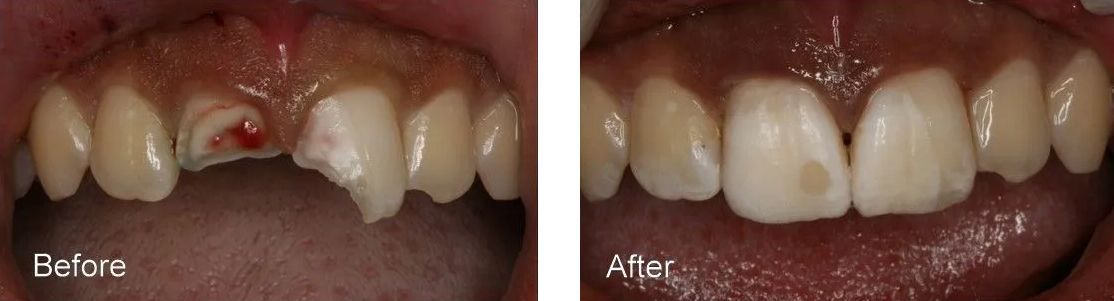
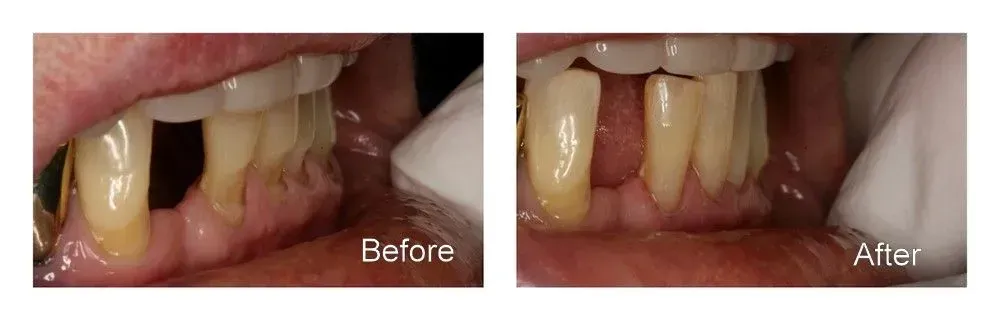
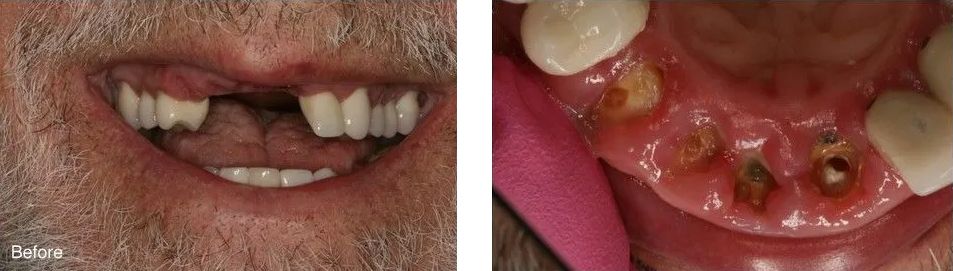
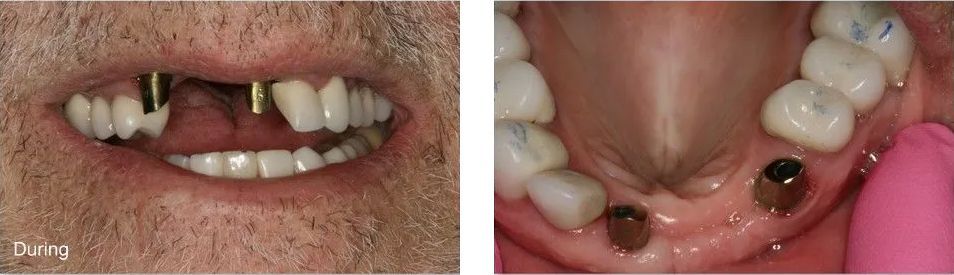
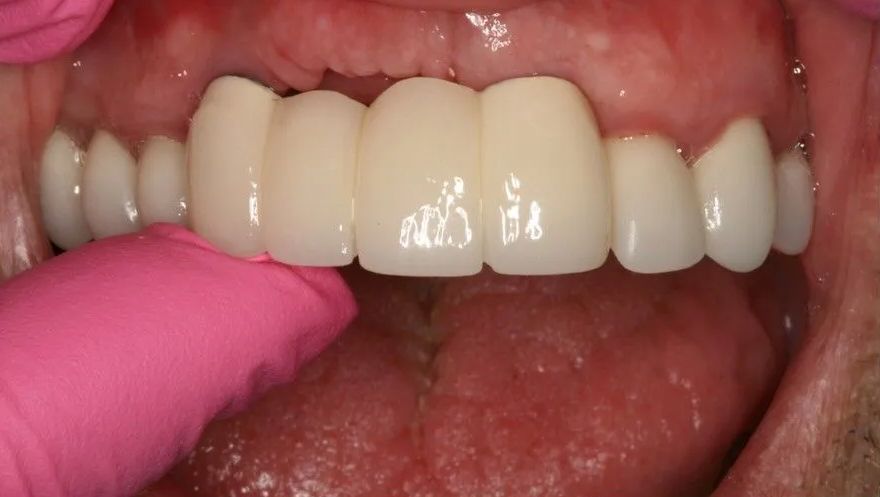
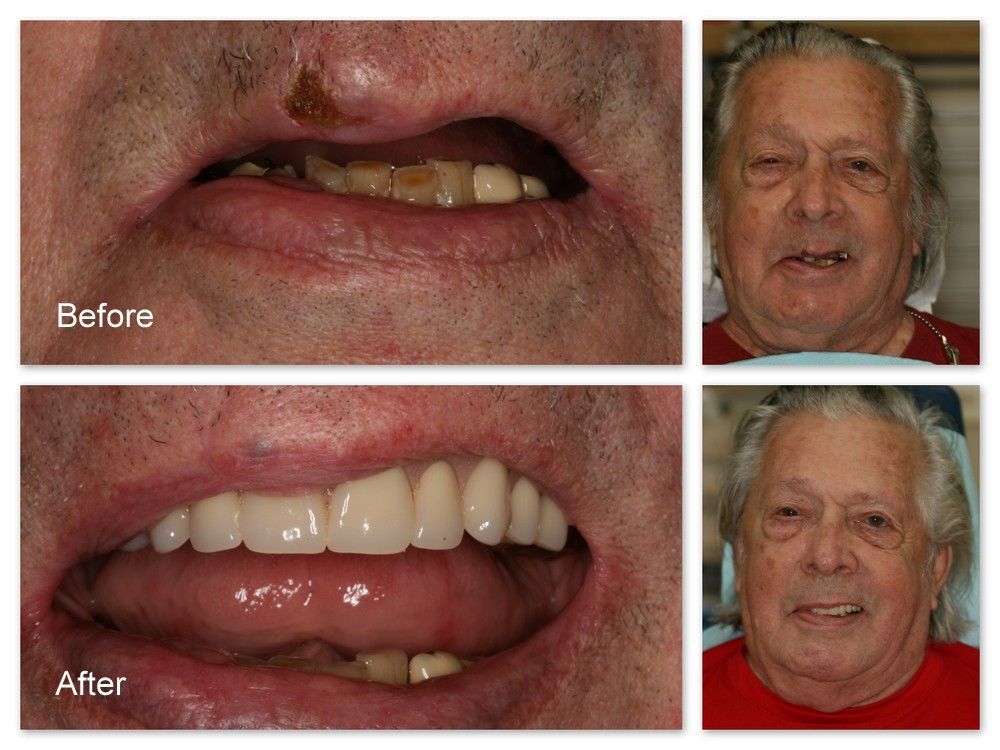
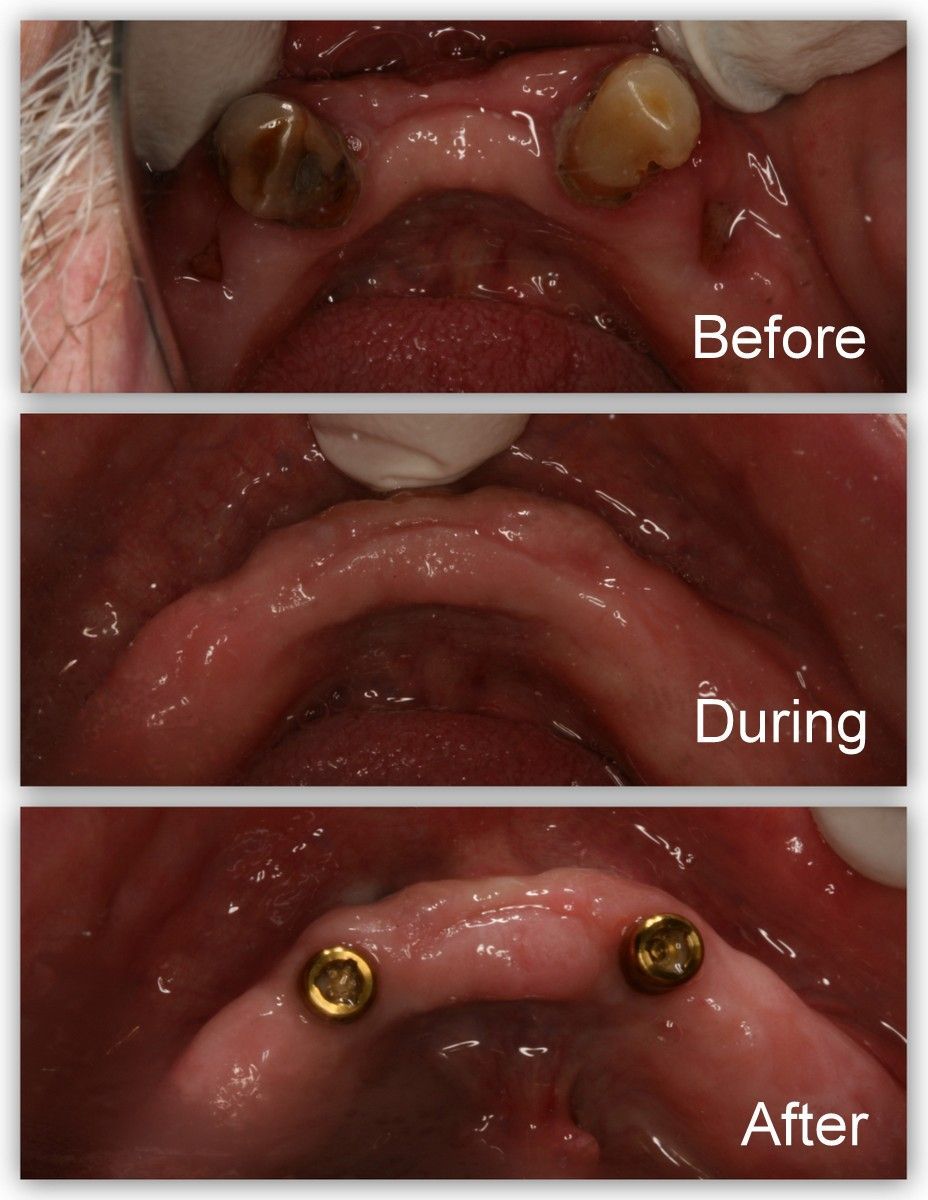
Case 1:
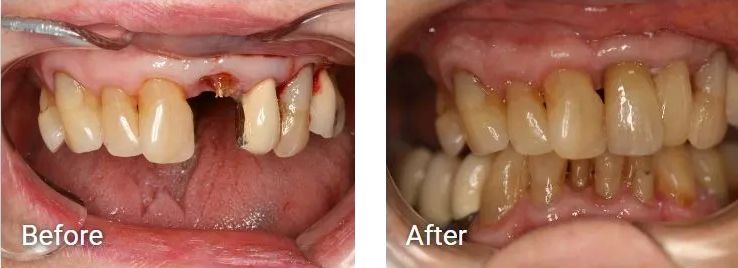
Before - This patient broke her front tooth completely off to below the gum line. It was not savable. Dr. Jack Hosner of Portage, MI placed a dental implant immediately after removing the tooth (at the same appointment). The patient wore temporary tooth replacements for the next 4 months. This time was necessary in order to allow the bone of the jaw to grow and attach firmly to the implant.
After - This is a photo of the final implant tooth replacement. The crown was screwed into the implant). Also, a new crown was placed on the tooth to the right of the implant tooth.
Case 2:
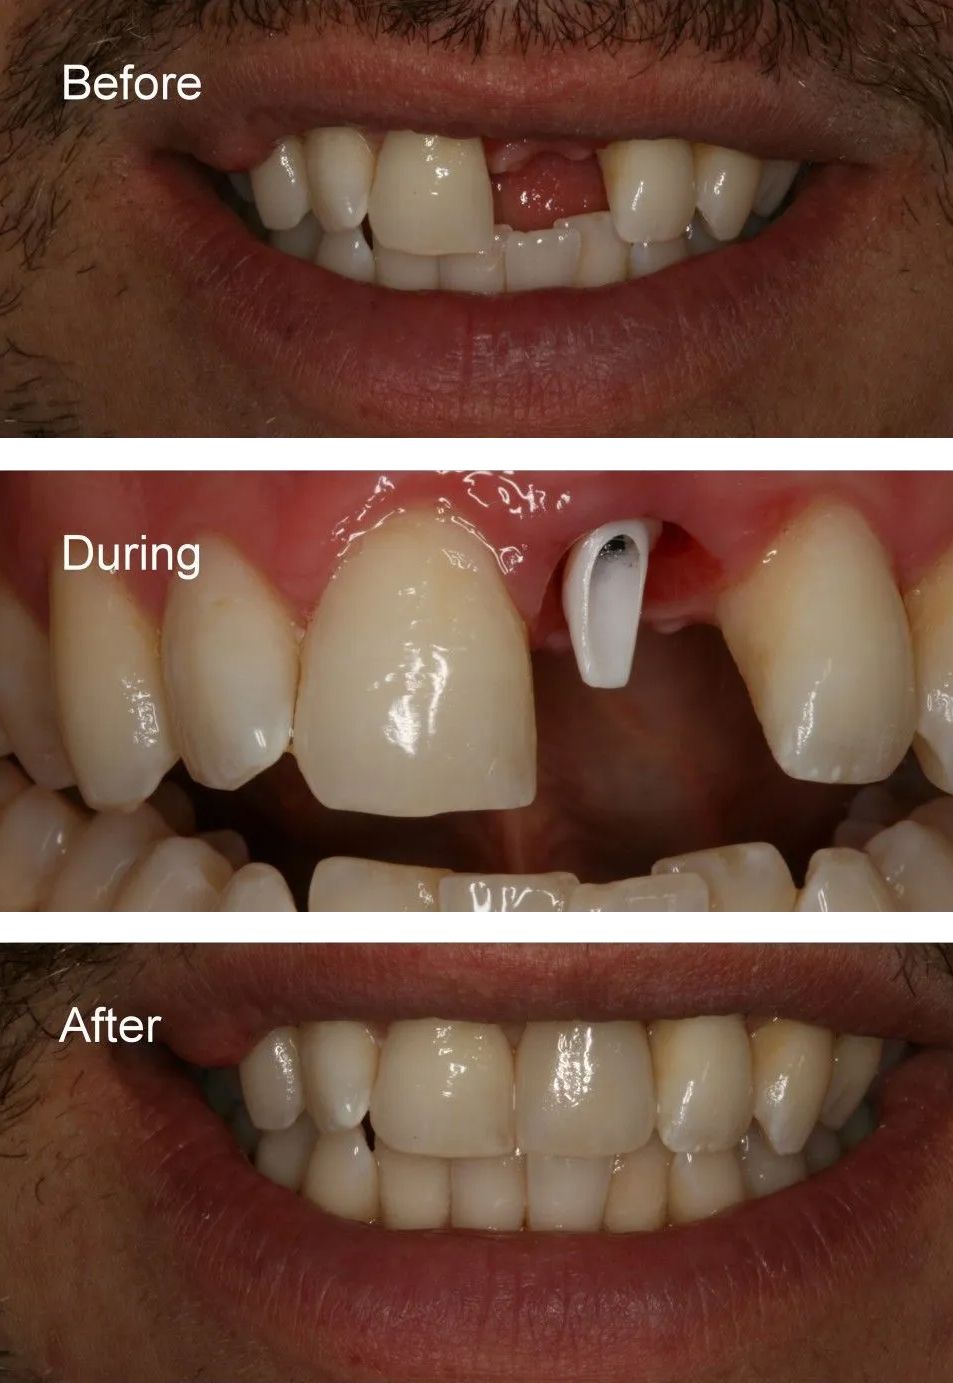
Before - This patient is missing his upper front tooth.
During - A dental implant was placed by Dr. Jack Hosner of Portage, MI and a zirconia abutment was screwed into the implant.
After - This picture shows the final porcelain crown cemented over the abutment.
Case 3:
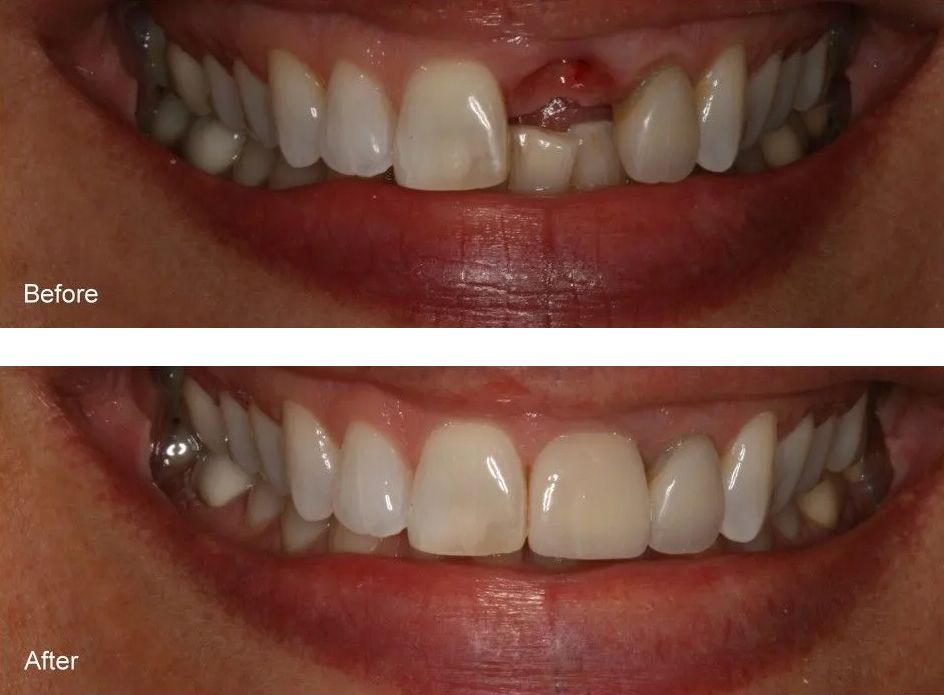
Before - This patient is missing her upper front tooth.
After - Dr. Jack Hosner of Portage, MI placed a dental implant and restored it with a porcelain fused to metal crown.
Case 4:
Before - Missing front tooth.
After - Dental implant was placed and restored with a porcelain crown by Dr. Jack Hosner of Portage, MI.
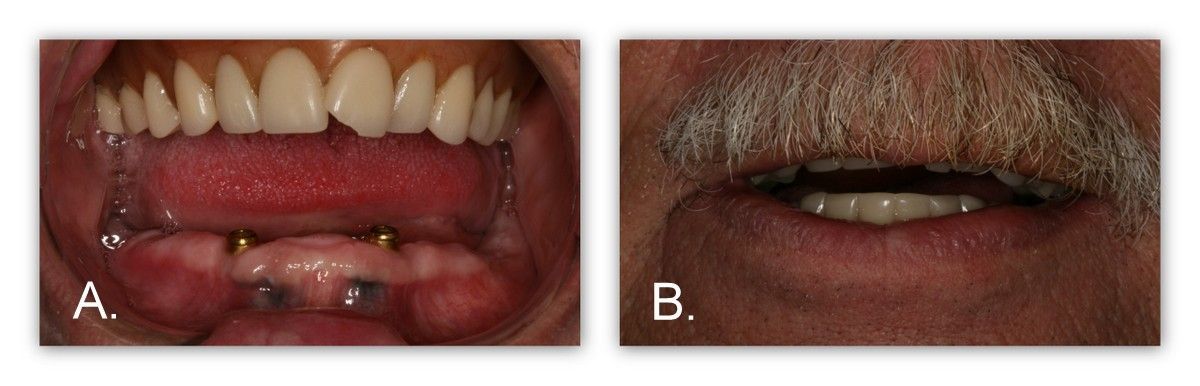
Case 5:
Before - This patient was in an accident which knocked out four of his upper front teeth, leaving just his broken roots.
During - Dr. Jack Hosner of Portage, MI removed the remaining roots of these broken teeth and placed two implants. In these images you see the metal abutments that are screwed into the implants several months after the extractions.
This is what it would look like if we just replaced the teeth only. The teeth would look way too big.
After - The final bridge restoration was cemented over these abutments and required not only the replacement of the teeth, but also the lost gum and bone that naturally shrink away after the teeth are removed.
Case 6:
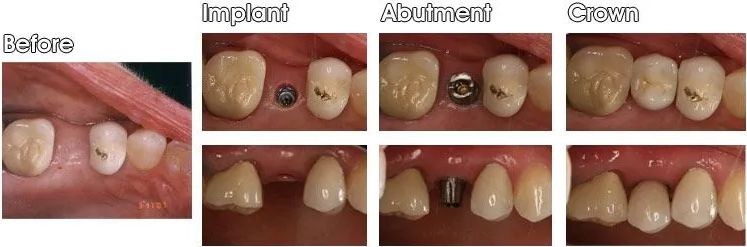
This patient of Dr. Jack Hosner’s from Portage, MI is missing an upper back tooth.
Implant - The implant Dr. Hosner placed.
Abutment -The abutment which is screwed into the implant.
Crown - The final crown cemented over the abutment.
Case 7:
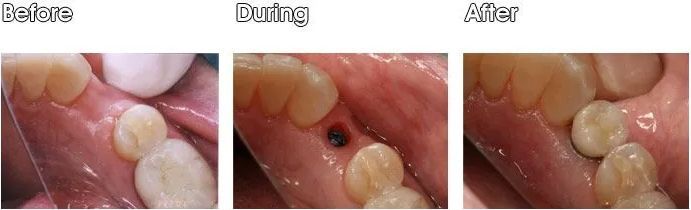
Before - This patient is missing a tooth.
During - This picture shows the top of the dental implant placed by Dr .Jack Hosner of Portage, MI
After - The final porcelain fused to metal crown has been placed.
Case 1:
Before - This patient was missing his front tooth and decided not to have it replaced with a dental implant, but he still wanted a replacement that was not a removable appliance.
After - Instead of cutting down both teeth on either side of the space to attach a traditional fixed bridge, Dr. Jack Hosner of Portage, MI bonded to the back of his front tooth a Maryland Bridge.
These pictures show the thin metal “wing” that is bonded to the one front tooth to hold the bridge in place. Very minimal tooth reduction was performed under no anesthetic.
Case 2:
Before - This patient wanted his front tooth replaced but could not afford a dental implant
After - Dr. Jack Hosner of Portage, MI bonded a Maryland Bridge to the backs of the adjacent teeth to restore the smile. Very little tooth preparation required.
Case 3:
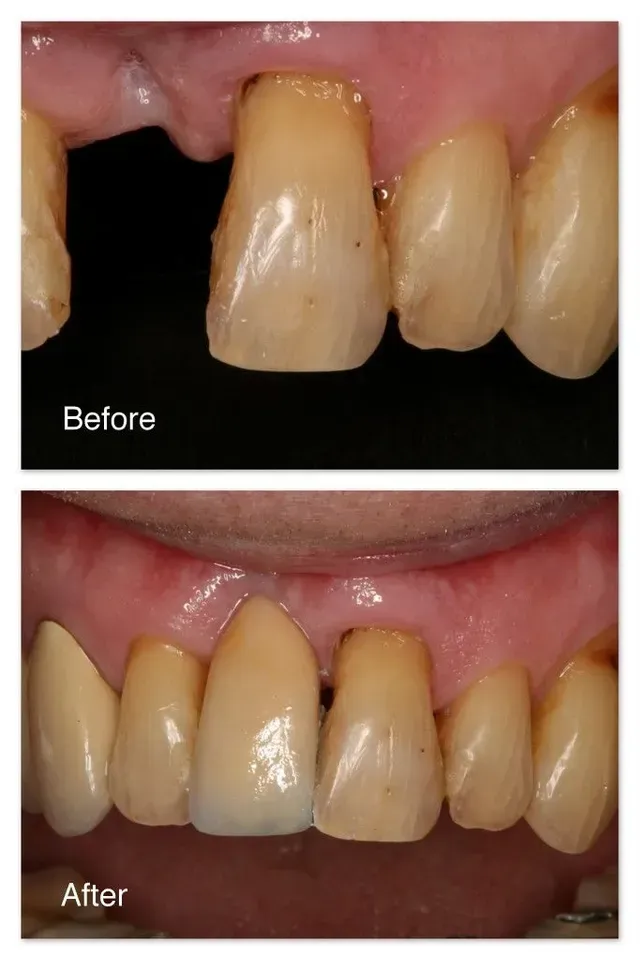
Before - This patient came to Dr. Jack Hosner’s office with a hopelessly failing tooth. This dark tooth could not be saved and needed to be removed.
After - This photo shows the dark tooth replaced with a three-unit porcelain fused to metal bridge.
Case 4:
Before - This Patient is missing a back tooth.
After - A single porcelain fused to metal (PFM) crown and a 3-unit PFM bridge was made by Dr. Jack Hosner of Portage, MI to restore the last three teeth and replace the missing tooth.
Case 5:
Before - This patient of Dr. Jack Hosner’s from Portage, MI is missing one upper back tooth and two lower back teeth.
After - One upper 3-unit porcelain fused to metal (PFM) bridge and one lower 4-unit PFM bridge were cemented into place.
Case 6:
Before - This Patient is missing one back tooth.
After - A 3-unit gold bridge and a single gold inlay were placed by Dr. Jack Hosner of Portage, MI.
Case 7:
Before– This patient from Portage, MI is missing two lower teeth on the right side separated by a tooth in-between the spaces.
After– Dr. Jack Hosner of Portage, MI cemented a 5-unit porcelain fused to metal bridge to improve this patients appearance and chewing efficiency. The teeth on the left were restored with dental implants and crowns. Implants were placed by an oral surgeon.
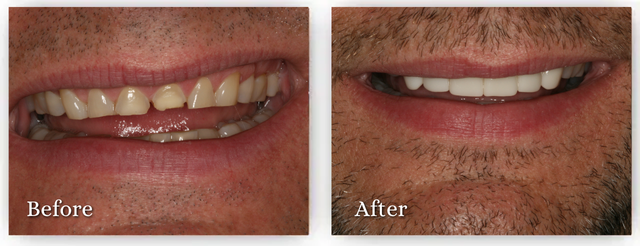
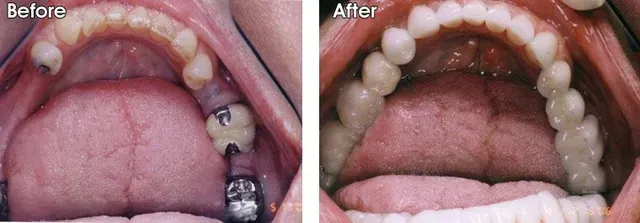
Complete and Partial Dentures
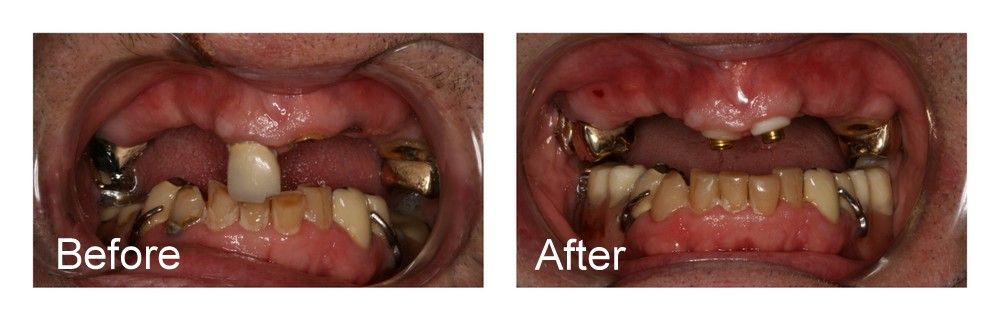
Case 1:
Before - This patient came to Dr. Jack Hosner of Portage, MI because of an already worn, old upper denture and extremely worn and decayed lower front teeth, as well as missing lower back teeth.
After - A new upper denture was fabricated. The lower front teeth were built back up with bonded fillings and porcelain crowns. A new lower removable partial denture was made to replace the lower back teeth.
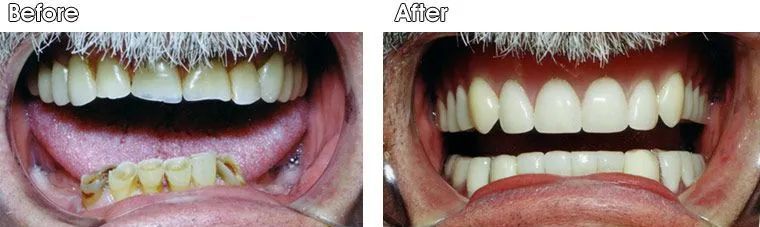
Same patient as above.
Case 2:
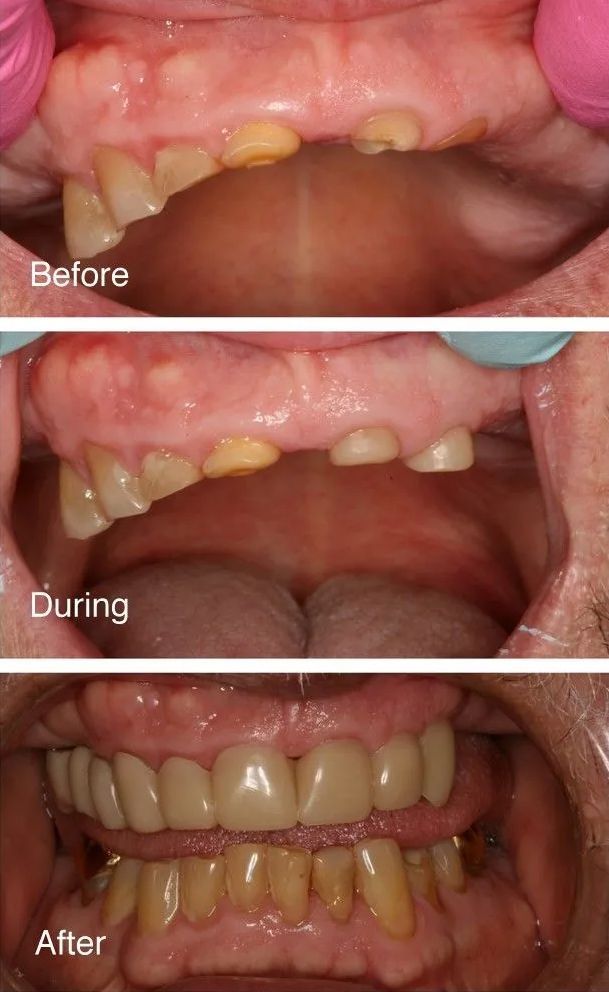
Before - This patient presented to Dr. Jack Hosner of Portage, Michigan with severely worn teeth due to acid erosion from a habit of sucking on lemons. Finances were limited. He could not wear a traditional removable partial denture due to excessive bone growth on the sides of his mouth nor could he afford to restore his teeth to normal or to have dental implants.
During - Dr. Hosner built up two of his teeth on the right side to help retain a removable “Snap-on Smile”.
After - This picture shows the “Snap-on Smile” in place. It grabs onto the existing teeth and is inserted and removed by the patient.

Before - Same as Above
After - Same as Above
Here is a picture of the “Snap-on Smile” out of the mouth.
Overdenture
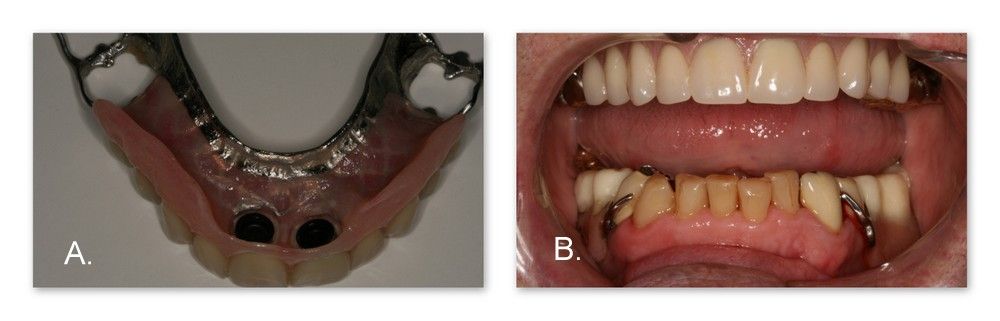
Case 1:
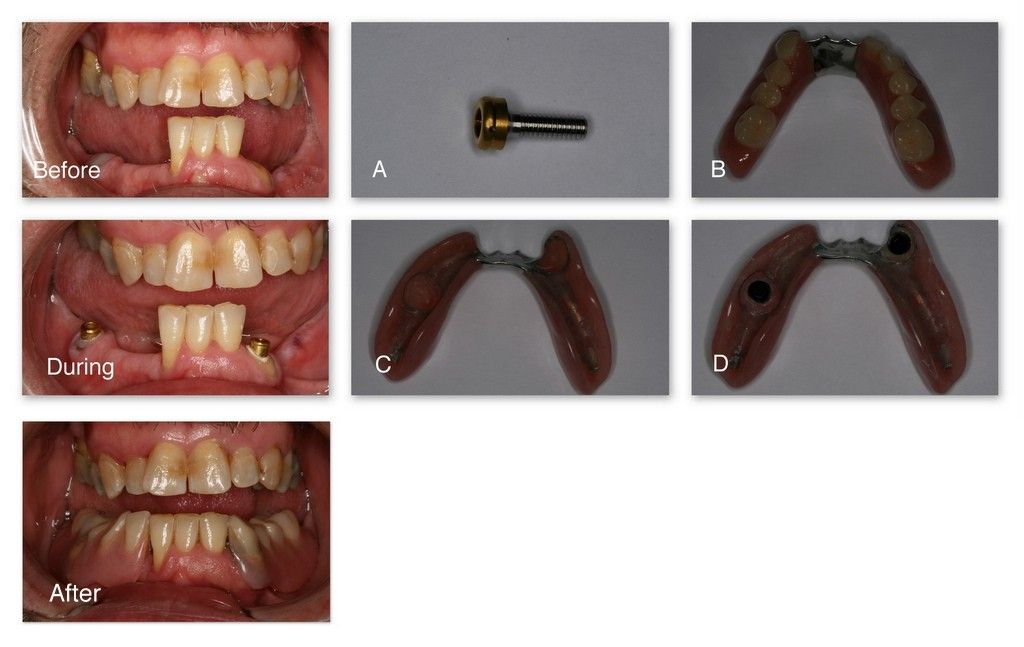
Before - This patient wanted to replace his missing lower teeth, but could not afford all implants.
During - His own tooth roots were used as anchors to more strongly hold on to a removable partial denture. Here you see that into the roots of two of his teeth were bonded metal attachments. These will help secure the denture. This also eliminates the need to have unsightly metal clasps around the teeth.
A– This is the attachment.
B– This is the top view of the partial denture.
C– This is the internal view of the denture, i.e. the part that rests on the gums.
D– This is the internal aspect of the denture after it has been modified with retentive units (the black parts). These black parts will snap over the metal attachments that are in the tooth roots in the patient’s mouth.
After– This shows the lower partial denture in place over the attachments.
Case 2:
Before– This patient of Dr. Jack Hosner’s has multiple missing and broken teeth. He wanted his smile restored.
After– Dr. Jack Hosner of Portage, MI used this patient’s two front teeth as attachments to retain a new partial denture.
Before– This is a close-up of the same patient.
After– His two front teeth were cleaned up and gold attachments were bonded into the roots in order to retain (hold in place) a new partial denture.
A.– This photo shows the underside of the partial denture with the retentive elements secured. These retentive units snap over the gold attachments to help hold the removable partial denture in place. Notice the metal clasps in the back which were needed to grab onto the patient’s existing teeth.
B.– With the partial denture in place, notice how the attachments eliminate the need for an unsightly metal clasp on a tooth in front.
Case 3:
Before– This patient of Dr. Jack Hosner’s has multiple missing, decayed, and broken teeth. He desired a partial denture but did not want to show a metal clasp on the front tooth.
After– Dr. Jack Hosner of Portage, MI made a new upper partial denture that used one of the broken teeth as an anchor for an attachment that the denture snapped onto. This provides the retention to hold the partial denture in place so that a clasp in the front isn’t needed. It also provides better retention than a clasp.

A.– Here is a close-up of his two broken and decayed teeth.
B.– Dr. Jack Hosner of Portage,MI cleaned the decay out from both of these roots, restored them both with bonded fillings, and bonded a gold attachment into one of the roots.
C.-This picture shows the underside of the partial denture with the blue part that snaps over the gold attachment. Two metal clasps are also seen that will grab onto two existing back teeth. This blue retentive unit eliminates the need to grab onto his front tooth with a metal clasp.
Case 4:
Before– This is a top view of this patient’s only remaining lower two front teeth, which need to be removed.
During– Here is the same patient after the teeth have been removed and bone grafting performed by Dr. Jack Hosner, and there is complete healing.
After– Dr. Jack Hosner of Portage, MI placed two implants into the areas where this patient’s teeth used to be. He also screwed onto those implants two gold retentive units (abutments).
A.– Dr. Jack Hosner then made a denture with retentive o-rings bonded to the underside surface. This ”overdenture” now can snap over the gold attachments, thus holding the lower denture in place.
B.– This final picture shows the patient with his lower denture in place, and staying in place.
Case 5:
Before– This patient has two teeth roots, one each on either side of his four front teeth.
After– Dr. Jack Hosner of Portage, MI bonded attachments into the roots of two teeth to help retain a partial denture.
Before– This is how the above patient presented before any treatment began.
After– This shows the final result with crowns on the four front teeth and the overdenture snapping over the gold attachments.
Sealant
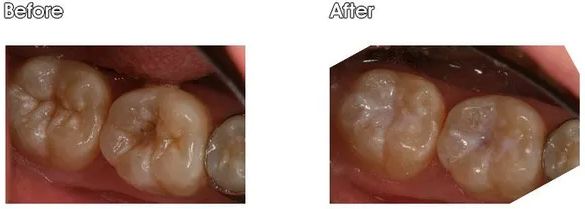
Case 1:
Upper Sealants
Before - Two molars with deep anatomical grooves at risk for decay.
After - Two sealants were placed at the office of Dr. Jack Hosner of Portage, MI to fill in grooves and protect teeth from decay/cavities.
Case 2:
Lower Sealants
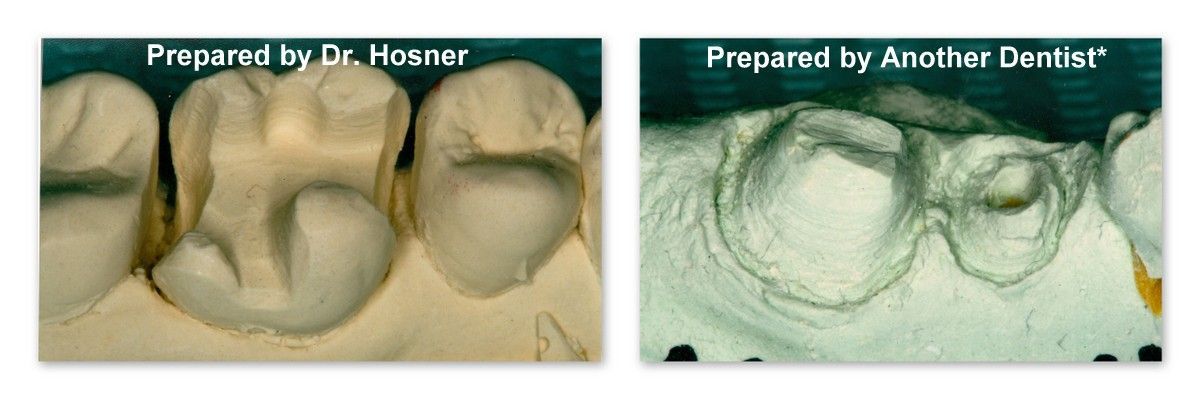
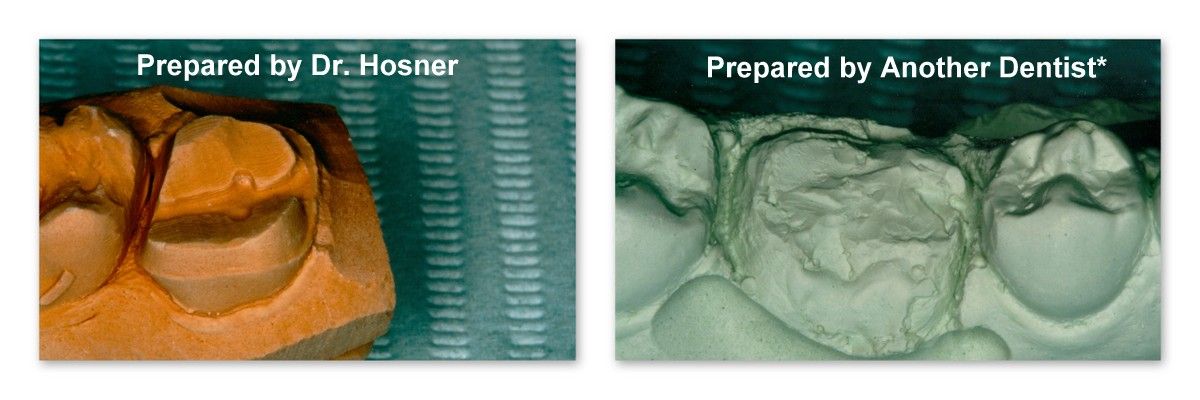
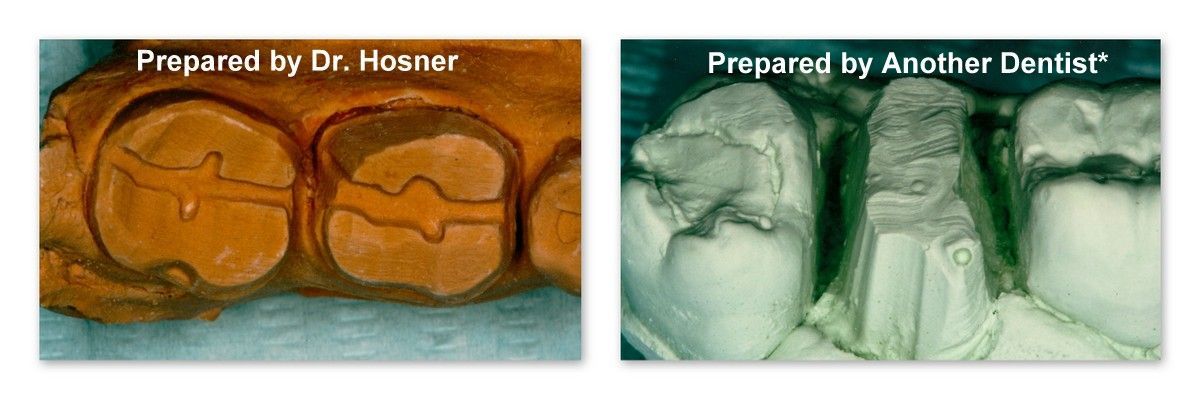
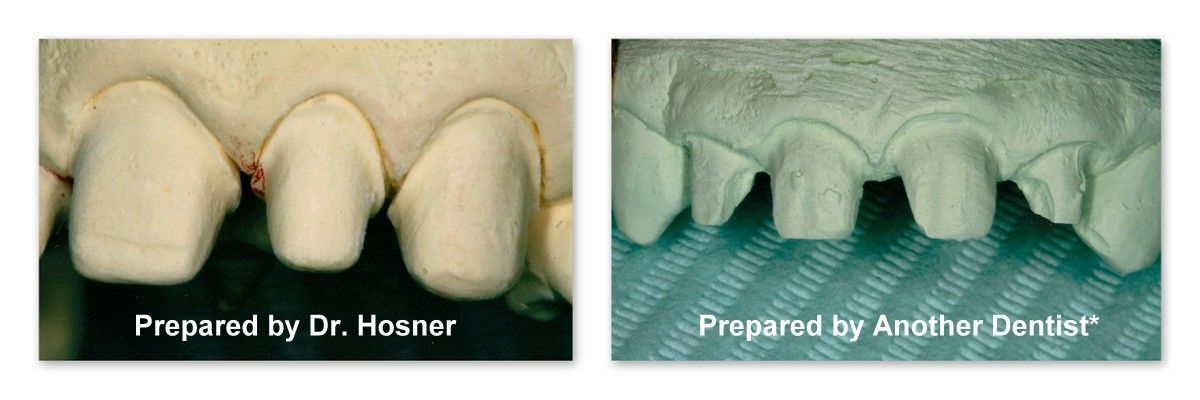
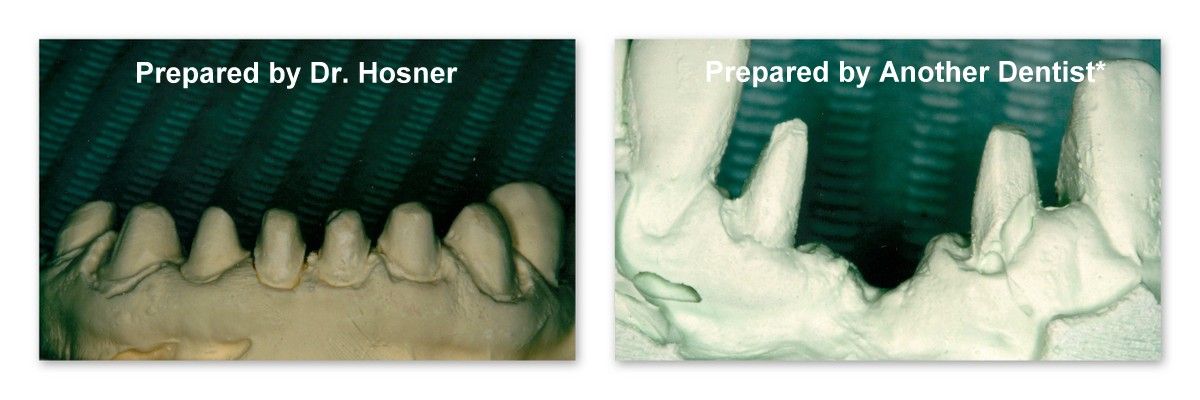
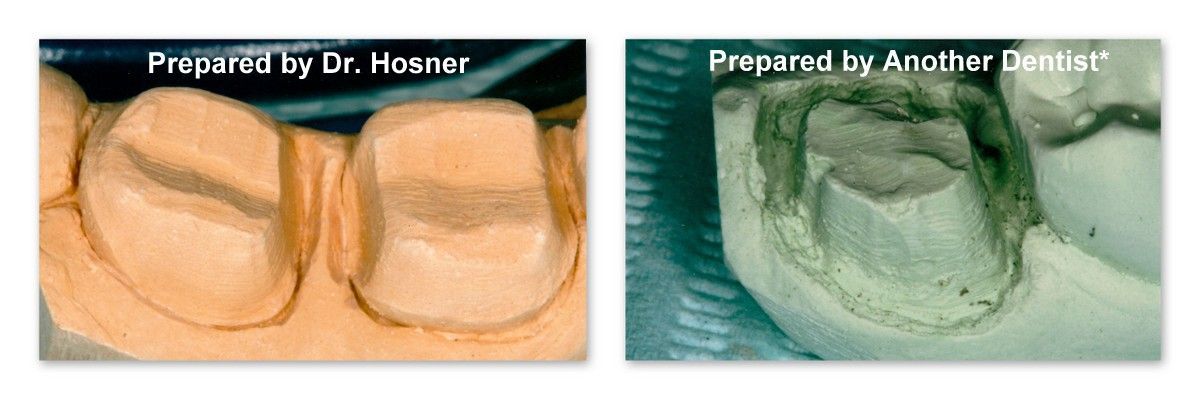
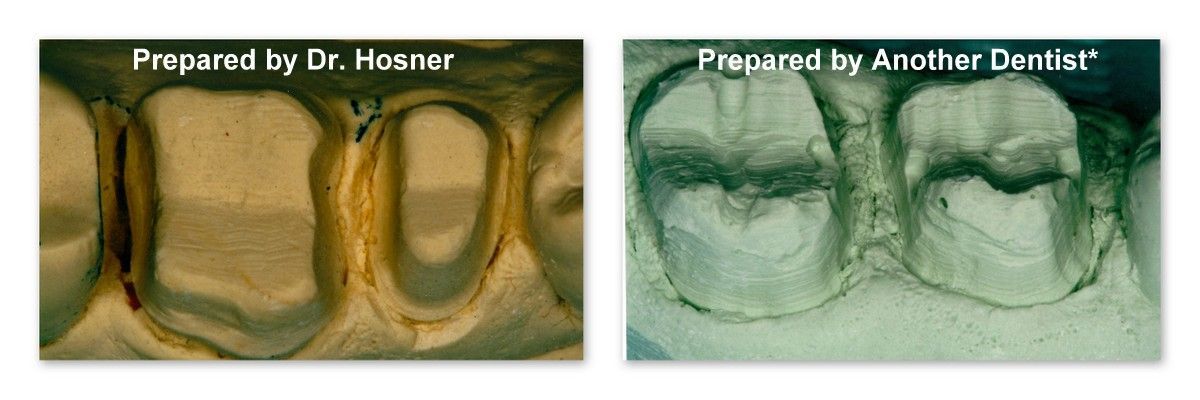
Models
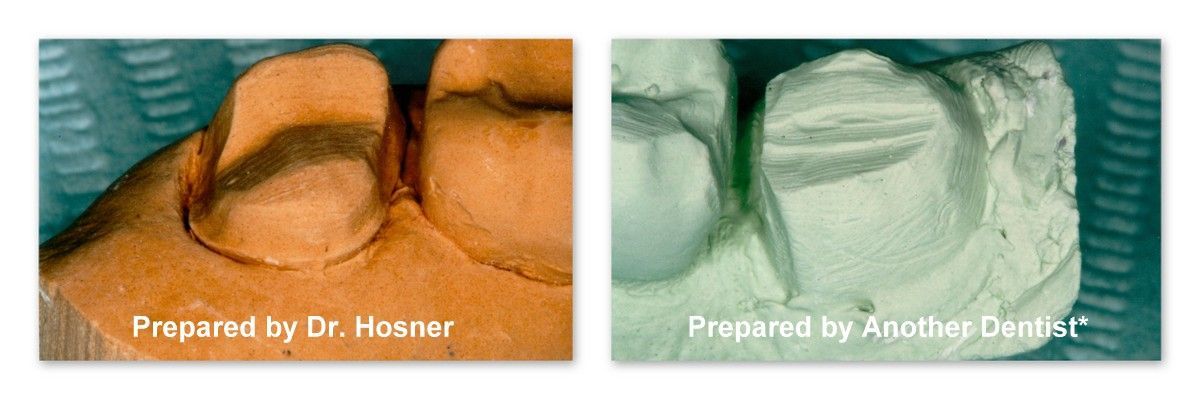
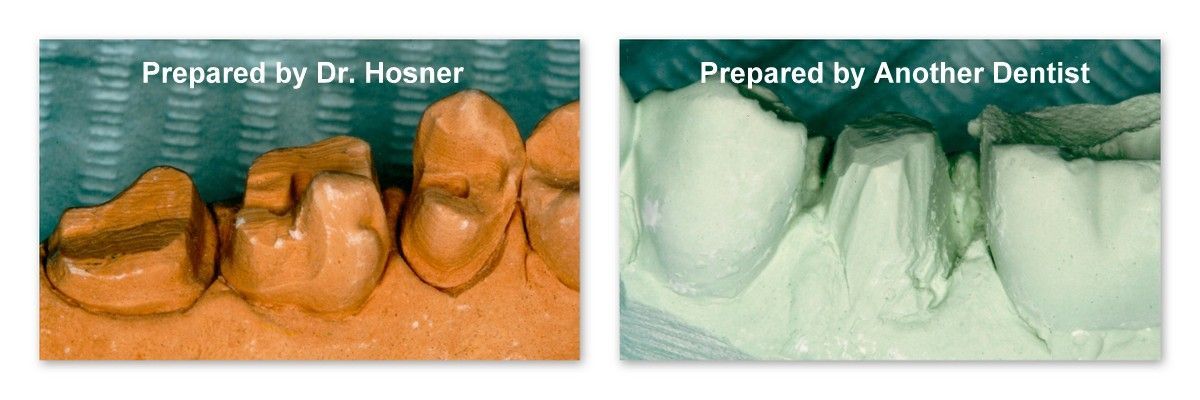
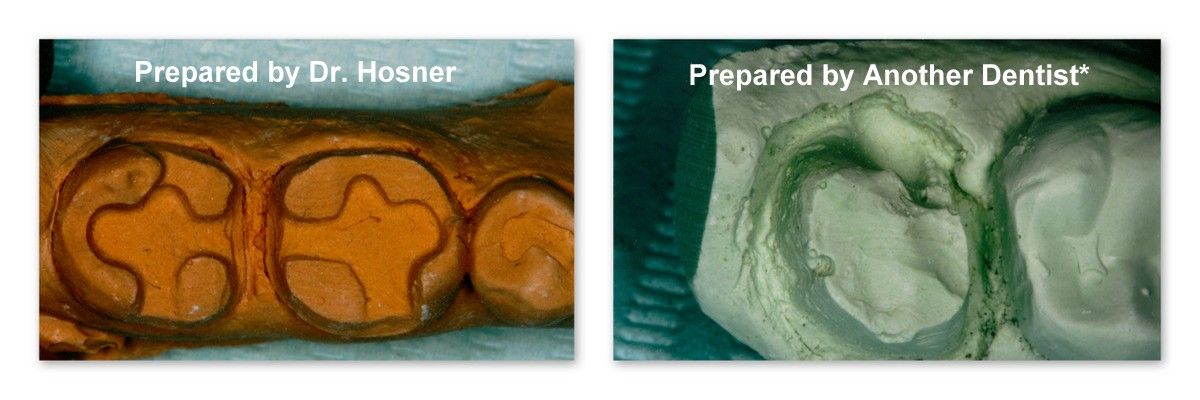
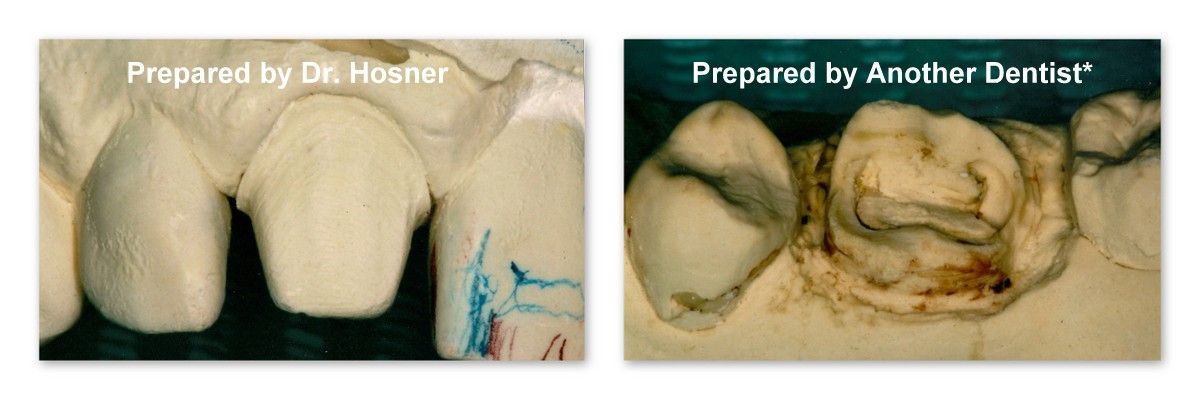
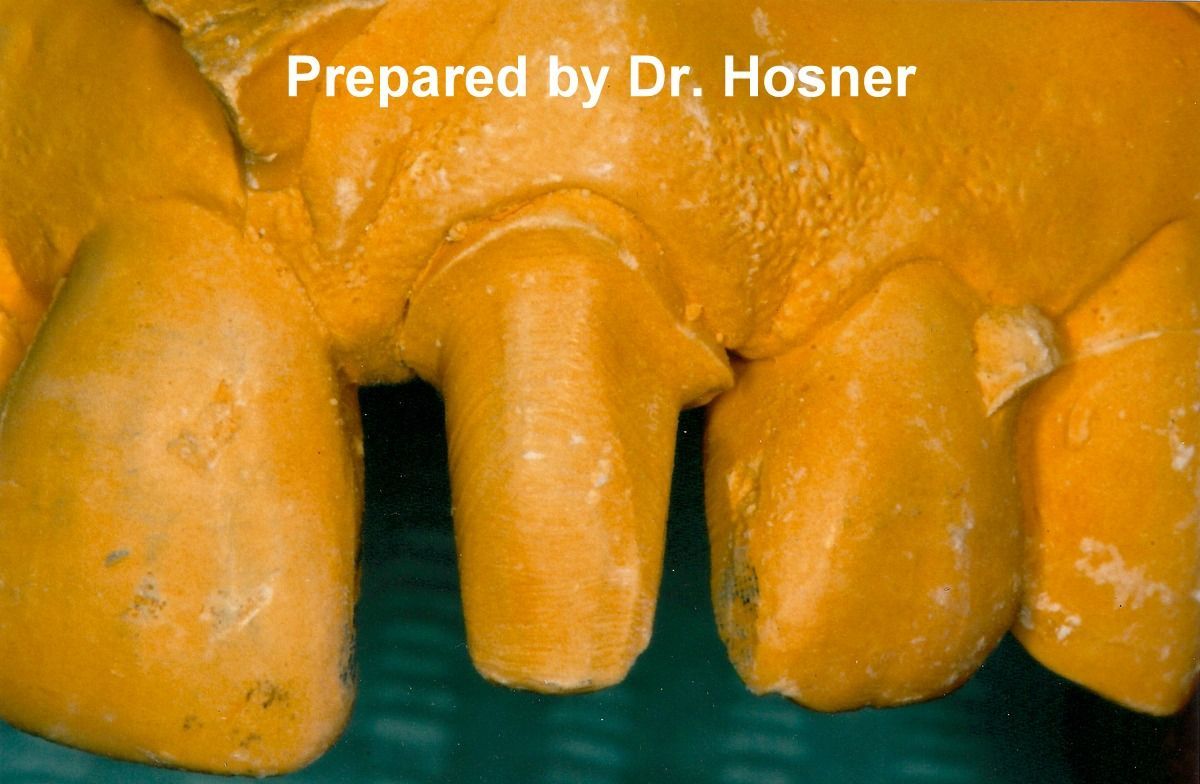
Models of teeth prepared (cut, shaped, and smoothed) by Dr. Jack M Hosner of Portage, MI. (Left side)
Notice the smooth and well-defined shapes of these models. You can clearly see the edges (margins) of the cut/prepared portion of the tooth versus the uncut/unprepared margins. In this way, the laboratory can make the restoration fit precisely to these prepared edges. This shows the high quality of the impression of that tooth. Both a well-defined tooth preparation and an accurate impression are necessary to give you (the patient) the most accurate fitting restoration possible.
Models of teeth prepared (cut, shaped, and smoothed) by various other dentists. (Right side)
* Theses are real cases from actual models submitted by other dentists. Dr. Hosner received these models from dental laboratories. These models from other dentists are not meant to imply or represent the quality of work done by all other dentists.
Notice the jagged, ill-defined shapes of these teeth. You can see that it would be hard for a restoration to stay on some of these teeth as there is very little tooth height and very little well-defined walls to retain anything. Also, in many, you cannot even see where the cut tooth ends and where the uncut tooth begins. In other words, the margins are not well identified. Therefore, the laboratory technician has no idea where or up to what edge to make the restoration fit. There’s no precise edge, so the lab must guess,…and this makes for a less accurate fit of the restoration to your tooth which can lead to gum disease, cavities, sensitivity, pain, and early loss of the restoration and potentially, early loss of the tooth itself!
Share On: